- The Source Screen has controls to select a source (so you can view its video feed), reload the list of available sources, change settings, and view help.
- The Monitor Screen has controls to change how the picture is displayed and how ’scopes markers, and other tools are shown.
- Camera controls are shown on the Monitor Screen for camera sources.
- Information about Luma Levels (tonal scales) used in Wi-Fi image feeds.
- Information about FieldMonitor LUTs; additional downloadable LUTs.
- Information about Sony remote control types and their differing features.
Source Screen
- The top of the screen shows the current Wi-Fi network. If it’s not the same network as your source is using, change it in your iDevice’s settings. (On iOS 13 or higher, FieldMonitor needs Location permission to show the network name. You can turn this on in iOS Settings > Privacy > Location Services > FieldMonitor.)
- When your source appears in the list, tap it to monitor it.
- Refresh rescans the network for sources and loads any new LUTs. Usually the source list updates automatically, but sometimes a source doesn't always show up when it should. Tapping
Refresh will make it appear if it is available.
If you use iTunes or Finder File Sharing to add LUTs while FieldMonitor is running, tapping Refresh reads the new cube files and converts them into FieldMonitor LUTs. - Scan opens a Scanner so that you can
connect to a Sony or Panasonic using its QR code display (iOS 11+), or a Canon, Sony, or Fujifilm using text recognition to read its SSID and password (iOS 15+). (Scan only appears on iOS 11+; not available on Mac).
- Settings lets you adjust system settings, control settings, camera options, and Teradek options.
- Help shows this help.
Tapping Settings on the Source screen displays the Settings menu:

SYSTEM SETTINGS
-
Name shows the name that FieldMonitor uses when communicating with cameras. If you use multiple iDevices for camera control, give each one its own name so you can tell them apart (this is especially useful with Canon and Fujifilm cameras). Tap the name to edit it. Names can contain up to 16 characters.
- Auto-Load First Source tells FieldMonitor to automatically load the first source found when the app is started or when the network changes. This saves a step if you always connect to sources in direct mode (using their own built-in networks) or if you only have one source on your local network.
- Orientation Lock locks FieldMonitor's displays to the current orientation. FieldMonitor’s lock is independent of your iDevice’s orientation lock, and it lets you lock FieldMonitor in landscape mode as well as in portrait mode. (Multitasking-capable iPads ignore FieldMonitor’s Orientation Lock: use the iPad's own Rotation Lock control instead.)
CONTROL SETTINGS
- There are four Aspect Ratio settings for framelines and masks. Tap a setting to change it. “Full (native aspect)” always uses the aspect ratio of the full frame image; other choices used fixed aspect ratios. Each Aspect Ratio setting includes a customizable preset you can edit:
-
- You can enter video-style numbers (17x9) or film-style numbers (1.896:1) or pixel dimensions (4096x2160).
- Width and height must be between 1 and 99999, and the final aspect ratio must be in the range 0.01:1 – 100:1.
- The value shown in the Monitor screen’s Frame Marker control panel will always be a short, film-style number like 1.9:1.
- You can enter video-style numbers (17x9) or film-style numbers (1.896:1) or pixel dimensions (4096x2160).
- Four Safe Area settings let you define the active area shown within a frameline or frame mask.
Three LUT settings let you assign monitoring LUTs (look-up tables). Initially, all three settings show the built-in LUT; add your own LUTs for more choices. Tapping a setting shows you the list of available LUTS to choose from:
- LUTs built in to FieldMonitor are shown first, followed by LUTs you’ve added.
- Add your own 3D LUTs by importing .cube files.
- You can delete added LUTs when you don’t need them any longer: swipe right-to-left or tap the Edit button to reveal Delete buttons.
CAMERA OPTIONS
- Camera Controls enables onscreen camera controls. Turn this OFF if you want to disable controls. Turning it off will not affect “Restart at 29:59” but it will prevent onscreen taps from affecting the camera’s settings or operations.
- Aperture & Shutter Display determines how the aperture and shutter controls are arranged onscreen:
-
- f/2.8 1/60 puts aperture on the left, followed by shutter. This matches older Panasonic camera control arrangement.
- 1/60 f/2.8 puts shutter on the left, followed by aperture. This matches Canon, Fujifilm, newer Panasonic, and Sony control arrangement.
- AUTO uses f/2.8 1/60 for Panasonics, and 1/60 f/2.8 for all other cameras.
- Extra REC Emphasis turns parts of the screen red when recording is active:
-
-
Off adds no emphasis.
- Frame adds a semitransparent red frame to the image.
-
App turns FieldMonitor’s background red, outside of the image and ’scopes. (16x9 devices without Face ID don't show any background in landscape orientation, so app emphasis is only useful in portrait orientation on these devices.)
- Both uses both Frame and App emphasis.
-
Off adds no emphasis.
-
Rocker Control HUD turns on a HUD (Heads-Up Display) in the middle of the picture for exposure and color rocker controls, so you can more easily see the values changing. A rocker's value appears in the HUD when you press the control, and disappears one second after you release the control.
-
Restart at 29:59 tells FieldMonitor to automatically restart cameras that stop recording around 29 minutes 59 seconds (restart occurs when any clip stops between 29:44 and 30:14). This option allows longer-duration recording using time-limited cameras, albeit with a slight interruption at the half-hour mark.
- Tap the Edit button to change the restart time if your camera has a different recording limit. Enter the minutes and seconds of your camera’s recording limit. If the Restart switch is on and the camera stops recording within 15 seconds of the restart time, FieldMonitor will restart it. For example, if you set the time to 20:00, the camera restarts whenever it stops recording with a clip length between 19:45 and 20:15.
- Regardless of settings, recordings of 5 seconds or less will not trigger a restart.
- When restarting a Sony, you may see a “can’t record video” message onscreen briefly, even when the recording restarts properly. The message appears when the camera is too busy to restart immediately; FieldMonitor keeps trying until it succeeds.
- Fujifilm Display Defaults lets you set default display behaviors with Fujifilm cameras:
-
- PHOTO ASPECT RATIO sets live-view cropping in manual-focus mode only (in autofocus mode, the camera tells FieldMonitor which aspect ratio to use). Set this to match the photo aspect ratio on your camera. Warning: mismatched aspect ratios may show you an improperly-cropped image. 4:3 is the “safe” choice: it does not crop anything, and will always show you your whole image (as Fujifilm images are always transmitted in a 4:3 frame), though the uncropped image may not fill the available screen area.
- ENLARGE SMALL IMAGE makes small 1:1 images (in both MF and AF modes) fill the image area vertically. This maximizes image size and ensures that AF focus areas are properly tracked and displayed. This should be on for the X-T3, off for the X-T100.
- Panasonic Image Mag enables "MF Assist" using a MAG button or a screen pinch. Turn this off when using electronically-coupled lenses in manual-focus mode and you don't have access to the camera’s controls directly. Why? If MF Assist is active and the lens focus ring turns, the camera stays in “camera busy” mode until a button on the camera body is pressed: you can’t regain control from FieldMonitor itself.
-
- For the same reason, set the camera’s MF Assist setting OFF, or enable the AF Mode button only: if focus-ring MF Assist is enabled when the focus ring is turned, the camera goes busy until a button on the camera is pressed.
-
Panasonic Max Resolution requests a 640x360 image from the camera. Turn this off to use 320x180 images, reducing bandwidth and improving frame rate. Panasonic Max Resolution defaults to ON; turn this off only if you find the displayed video too choppy or laggy, or you need to conserve bandwidth for multiple cameras on the same network.
-
Panasonic Forced Reset resets certain Panasonic cameras (GH6 and later) when you connect to them “via network” (using a separate access point). Panasonic Forced Reset has no effect on older cameras or when you connect directly. Panasonic Forced Reset defaults to ON.
Newer Panasonics don’t handle long disconnections gracefully when connected “via network” (using a separate access point). If you disconnect from the camera long enough for the camera to display “Not connected to the app” and then reconnect, the camera stops responding, its displays and HDMI output go black, and any recording in progress stops. You have to half-press the camera’s shutter release or press the camera’s Play button twice to recover control, or even turn Wi-Fi off and on again.
Turn Forced Reset ON if you won’t be able to use the camera’s own controls to reset it. FieldMonitor will reset a “via network” camera whenever you tap the camera’s name in the Source screen the first time it connects, or when FieldMonitor detects that the connection has been interrupted for at least 10 seconds. When reset, any recording will be stopped, and HDMI output will be blanked.
Turn Forced Reset OFF if you can't risk having a live recording interrupted by reconnection: as long as you reconnect before the camera says “Not connected to the app”, you can resume operations uninterrupted.
Note: once the camera reports “Not connected to the app”, it will stop recording and HDMI output when reconnected, whether or not Panasonic Forced Reset is used. All Panasonic Forced Reset does is make it easier to regain control after a “Not connected to the app” event.
You can't use Panasonic Forced Reset after the camera stops responding; it won't reset remotely once it has hung up. You will have to press a button on the camera to recover it, or stop and restart its Wi-Fi.
- Sony Max Resolution requests a 1024x576 image from the camera. Turn this off to use 640x360 images, reducing bandwidth and improving frame rate. Sony Max Resolution defaults to OFF; you can turn it on for finer focusing detail, but latency and frame rate may suffer. Sony Max Resolution
- Sony* AF w/ Shutter (only for Sony* cameras — cameras with a * after their name): When AF w/ Shutter is ON, FieldMonitor tries to focus when PHOTO is tapped. When it is off, PHOTO only takes a picture (except as discussed below). Sony* AF w/ Shutter has no effect when recording video; it only changes what the PHOTO button does.
-
- When the camera’s “AF w/ Shutter” is turned OFF, always turn this OFF, to avoid a four-second “focusing...” delay when taking a photo.
- When the camera’s “AF w/ Shutter” is turned ON, turn this ON to autofocus when taking a picture, or OFF to avoid refocusing when PHOTO is tapped. However:
- Still photos in AF-C mode always use autofocus when the camera’s “AF w/ Shutter” is turned ON, even if FieldMonitor’s setting is OFF. When FieldMonitor’s setting is OFF, AF-C autofocusing may fail and AF-C mode photos may not always be taken.
- Continuous shooting, self-timer, and bracketing photos may use autofocus when the camera’s “AF w/ Shutter” is turned ON, even if FieldMonitor’s setting is OFF.
(When the camera’s “AF w/ Shutter” is turned OFF, no remote-control focusing is possible. Tapping AF causes a four second “focusing...” delay, but no focusing occurs. If FieldMonitor’s “Sony* AF w/ Shutter” is ON, tapping PHOTO also causes a four second “focusing...” delay before taking a picture, but no focusing occurs.)
- Photo Review Time (Canon, Fujifilm) is the time a still photo's review image will be shown. You can turn it off completely, show it for 2, 5, or 10 seconds, or hold it onscreen until you tap the OK button (tapping OK returns to live-view regardless of the review time).
-
- While reviewing a photo, certain controls won't have any effect: you can't change LUT settings, change scopes, or turn false color on and see the results. Only the LUT, scopes, and false color settings that were active when the photo was captured are available.
- When using a Canon, set the camera’s Image review setting to a shorter time than FieldMonitor's Photo Review Time for best results:
-
- If your camera's Image review time is longer than FieldMonitor’s, returning to live-view will show a frozen image. To unfreeze the image, tap AF or METER, or half-press the camera’s shutter button.
- If you turn Photo Review Time off, the camera will show a freeze frame based on its own Image review setting, but that frame is not be captured at the same instant as your actual photo, and it will not show the exact exposure. To unfreeze the image, tap AF or METER, or half-press the camera’s shutter button.
- This setting is ignored for Panasonic and most Sony cameras; those cameras provide their own review images automatically. Use the camera’s own menu to set the review time. “Smart Remote” Sonys do not display review images in FieldMonitor regardless of their Auto Review setting.
TERADEK OPTIONS
- Convert Images to RGB flips the Teradek’s YCrCb images to RGB for display. RGB images let you apply LUTs and use Focus Assist, but they drain your iDevice’s battery faster, and reduce frame rates on older, slower iDevices — so turn this on only when you need to use LUTs or Focus Assist. (Generally speaking, Convert Images to RGB works well on iDevices with A9 or later CPUs; earlier CPUs drop too many frames to be useful.)
- Cube: Quickview Preferred toggles whether a Quickview stream is preferred when receiving Cube feeds. When on, Quickview will be chosen ahead of other stream types, when available. When off, Quickview will only be used if no other feed is found. This option has no effect on the feeds from Teradek transmitters other than Cubes.
- Serv: Resolution sets the Serv’s video resolution. This only applies to Serv connections. Increasing resolution may increase the bit rate to prevent encoder hangups.
- Serv: Bit Rate sets the Serv’s encoder bit rate. This only applies to Serv connections. Decreasing bit rate may decrease resolution to prevent encoder hangups.
These settings are sent whenever you connect to a Serv. If you have multiple Serv clients, the settings for the last one to connect will “win”; for best results, all clients (whether FieldMonitor or VUER) should use the same or similar Serv settings.
Setting too low a bit rate for a given resolution may cause encoder “hangups”: the frame rate may drop to ~1fps. FieldMonitor prevents setting combinations of resolution and bit rate known to cause hangups, but this does not guarantee smooth video under all circumstances. If you see very slow image updates, try increasing bit rate and/or decreasing resolution.
Monitor Screen
- The navigation bar at the top of the screen shows the current source name.
< Source returns to the Source screen. One or more buttons on the right,
desqueeze adjustment
 ,
false-color controls
,
false-color controls  , and
display controls
, and
display controls  , open control panels.
- If the navigation bar is not visible, tap the screen to show it.
- On iPhone and iPod touch in landscape orientation, the iDevice’s battery level is shown in the upper right corner of the picture. It is displayed as i:xx% or iPWR:xx%, where xx is the battery level, to distinguish it from a camera power readout. If it isn't visible, tap the screen to show it.
- In Landscape orientation (iDevice held horizontally) showing one ’scope, the picture fills the screen and the ’scope floats on top of the picture. Move a ’scope by dragging it, and resize it with a two-finger pinch.
- In Landscape orientation showing all three ’scopes, two display modes are available: W,V,H with all ’scopes movable and resizable, floating on top of the picture; and 4-WAY where the three ’scopes and the picture share a fixed layout.
- In Portrait orientation (iDevice held vertically), the picture normally fills the top of the screen and the ’scopes fill the rest of the screen in a 4-way layout. If the picture fills more than 75% of the screen height, ’scopes float on top of the picture and are movable and resizable.
- Tap
display controls
to open the display control panel. Controls are divided into sub-panels labeled
Hide,
Scope,
Mark,
Image, and
Level. (Level is available for cameras, and for Teradeks when Convert Images to RGB is enabled.)
 Hide controls which onscreen elements are hidden when the screen is tapped. Use screen taps to quickly declutter the screen or toggle focus assist, ’scopes, false-color, the current LUT, and/or markers. Screen taps only hide or show elements that are already turned on: the current ’scope(s), the current markers, etc. So, for example, if you have all markers turned off in the Mark controls, a screen tap won’t turn them on, and a screen tap only hides and shows a ’scope if that ’scope is already enabled. By default, two sets of controls are affected by screen taps:
-
Top-line Controls: those in the navigation bar at the top of the screen, including
< Source, the source name, and control panel buttons
,
and
. (When the navigation bar doesn't overlay the image, the controls are dimmed instead of hidden.)
- Camera Controls (for camera sources only).
(The device’s battery level visibility is controlled by the Camera Controls setting for camera sources, and by the Top-line Controls setting for Teradek sources. The battery level only appears on iPhones and iPads in landscape mode when the status bar’s battery icon isn't visible.)
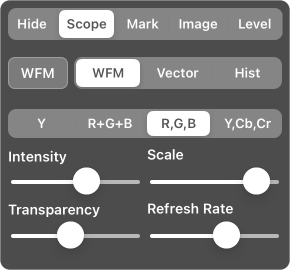 Scope controls the engineering ’scopes: their types, layout, and display options.
- OFF | WFM or Vector or Hist | W,V,H | 4-WAY toggles between no ’scopes shown, a single ’scope, and a three-’scope display. W,V,H shows three ’scopes floating over the picture while 4-WAY uses a fixed quad-split layout.
-
- In portrait orientation, W,V,H is shown when the picture fills more than 75% of the screen height, otherwise 4-WAY is shown.
- WFM | Vector | Hist sets and adjusts the current ’scope: WFM (waveform monitor), Vector (vectorscope), or Hist (histogram). In single-’scope display, tapping chooses the ’scope to display and adjust. When multiple scopes are visible, tapping chooses which ’scope to adjust.
-
-
When WFM is selected:
Y | R+G+B | R,G,B | Y,Cb,Cr changes the WFM display:
Y shows brightness (Y or luma channel) for exposure checking.
R+G+B and R,G,B show red, green, and blue channel waveforms, to look at color balance and color separation.
Y,Cb,Cr shows luma and color-difference signals so you can check to see if saturated colors are clipping. -
When Vector is selected:
100% | 75% | 2x | 4x sets the vectorscope magnification and target display:
100% shows targets for 100% saturation colorbar vectors (typical for EBU bars).
75% places the targets for 75% colorbar vectors (typical for SMPTE and ARIB bars).
2x magnifies the vector display by 2x for DSC Labs or Gamma & Density color charts.
4x gives 4x magnification for looking at camera black & white balances. -
When Hist is selected:
Y | R+G+B | R,G,B | Y,R,G,B chooses the histogram display:
Y shows brightness (Y or luma channel) for exposure checking.
R+G+B and R,G,B show red, green, and blue channel histograms, to look at color balance and color distribution.
Y,R,G,B shows both luma and color-channel histograms.
-
When WFM is selected:
Y | R+G+B | R,G,B | Y,Cb,Cr changes the WFM display:
-
Intensity determines how sensitive the current ’scope is. Decrease to see only the strongest part of the signal; increase to see every fine detail.
- Scale changes the scale (graticule or overlay) brightness for the current ’scope.
- Transparency adjusts the transparency of the current ’scope when it is shown on top of the picture (transparency isn’t adjustable when ’scopes don't overlay the picture).
- Refresh Rate: slower saves energy; faster uses slightly more power and may cause the image to break up or latency to increase on older iDevices (mostly with Teradek sources). The best setting depends on the speed of your iDevice and your personal preferences. The Refresh Rate setting is shared by all ’scopes and camera status displays.
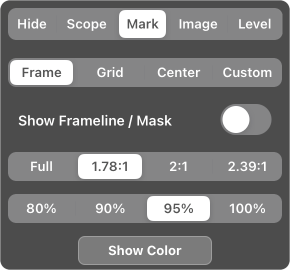 Mark controls image markers: framelines, masks, grids, center marker, and a custom crosshair.
- Frame shows a frameline and/or mask using the aspect ratio and safe area you choose. "Full" uses the aspect ratio of the full image while other choices let you set a fixed aspect ratio. (To change the options available, edit them in the Source screen’s Settings menu.)
- Grid displays an alignment grid. The grid is normally drawn across the entire frame, but if you turn on Grid Inside Frame Marker the grid will be constrained within the frameline or mask instead, when Show Frameline / Mask is on. You can choose 1/3 (“rule of thirds” grid), 1/4 (screen divided into fourths horizontally and vertically), or 1/4 + X (1/4 grid plus a corner-to-corner X).
- Center shows a marker in the center of the frame. Choose between Dot, Cross, and Dot+Cross.
- Custom displays a crosshair you can position wherever you like. Tap Move Marker, then drag the crosshair where you want it. Tap Done to lock it in place and return to the display controls.
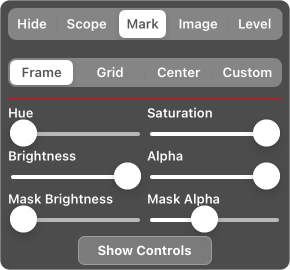
- Show Color | Show Controls switches between color settings and marker controls. The color settings include a sample line showing you the current color, and sliders to adjust it. All markers have hue, saturation, brightness, and alpha (opacity) settings. Frame markers also have brightness and alpha settings for the mask area outside the frameline.
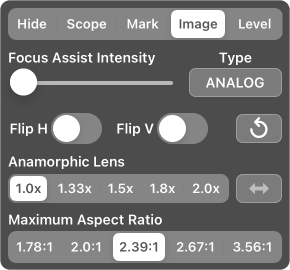 Image controls focus assist (camera sources, and Teradeks when Convert Images to RGB is ON) and image geometry.
- Focus Assist Intensity adjusts the amount of focus-assist processing added to the picture. Slide it all the way to the left to turn Focus Assist off.
-
- Focus Assist only affects the displayed image, not ’scopes or false-color.
- Focus Assist is not available on iOS versions 11.0 and 11.1.
- Type changes the Focus Assist display type, cycling through ANALOG, EDGE, DIGITAL, and DIGITAL:
-
- ANALOG sharpens the picture, making focused details stand out. Analog emulates the peaking function of video and cine camera viewfinders.
- EDGE (iOS 9+ required) displays bright sharp edges on a low-contrast picture.
- DIGITAL (iOS 10+ required) highlights sharp details with a red or cyan overlay. Digital works like the peaking function on many mirrorless cameras.
- Flip H and Flip V flip the image horizontally and vertically.
-
 rotates the picture 90º (iOS 10+ required).
-
Anamorphic Lens sets the coarse anamorphic desqueeze amount: 1.0x (no desqueeze), 1.33x, 1.5x, 1.8x, or 2.0x. When desqueeze is active the desqueeze adjustment button
or
 appears.
 or
or
 sets the desqueeze direction. Set to match your anamorphic adapter’s orientation.
- Maximum Aspect Ratio lets you limit the width of a widescreen image, cropping the sides if needed to show just the central portion: 1.78:1 (16x9), 2:1, 1.39:1, 2.67:1, or 3.56:1. Maximum Aspect Ratio will only crop the image if the full-width image is wider than the selected aspect ratio; it has no effect on images with lower aspect ratios.
-
- ’Scopes always display data for the full-width image, regardless of Maximum Aspect Ratio settings.
- On screens with rounded corners (iPhone X series, newer iPad Pros), picture edges outside the cropped aspect ratio may be visible. These areas are dimmed for use as a lookaround area.
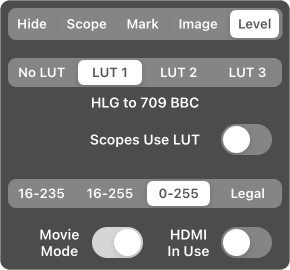 Level is used to apply monitoring LUTs and to adjust FieldMonitor for Panasonic image levels (available for camera sources, and Teradeks when Convert Images to RGB is ON).
- No LUT | LUT 1 | LUT 2 | LUT 3 selects one of three preset LUTs to monitor the image with.
-
- You can change the three preset LUTs in the Settings menu.
- Note: Panasonic’s VLog and VLog-L always use Luminance Levels 0–255, so make sure FieldMonitor is using those levels when you're shooting log.
- Scopes Use LUT: When off, scopes are based on the original image. When on, the scopes are based on the image with the LUT applied.
-
For Panasonic cameras only:
-
- 16–235 | 16–255 | 0–255 | Legal selects the Luminance Levels used for the ’scopes and false-color displays, to match what the camera is using. If your camera doesn’t have a Luminance Levels setting, use 16–255.
- Movie Mode should be on when your camera is in Creative Video Mode (the mode-dial setting with the movie camera, if your camera has such a mode).
- HDMI In Use should be on if your camera is outputting live video over HDMI during recording.
See About Luma Levels for more details.
-
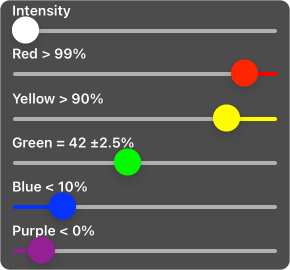 Tap the false-color controls button (if available on your iDevice) to adjust the false-color overlay.
- Intensity sets the strength of the overlay, mixing between the normal color picture and the false-color image.
- The remaining controls set brightness levels to trigger false colors: red and yellow above their levels for overexposure warnings; blue and purple below their levels for shadow-detail indications; and a green level around which the image will be shown in green: use this for neutral gray, skintone, or any other target level you want to monitor.
- Sliding a control all the way to the left turns it off.
-
 Tap desqueeze adjustment or to fine-tune anamorphic desqueeze. Use it to set the desqueeze ratio for lenses close to listed values (for example, 1.2x for 1.33x, or 1.75x for 1.8x), and to correct “anamorphic mumps” at close focus distances (a 1.33x lens may only squeeze 1.23x at minimum focus).
 -
- The slider adjusts the desqueeze ratio.
- The
ON/off button shows and hides the “target squircle”.
The target squircle is a rounded square floating over the image: use it to check the desqueeze ratio. Pinch to resize it and drag to move it.
Place the squircle over a target in the image that is supposed to be perfectly round or perfectly square; a ball works well as it’s always round no matter what angle it’s at. Resize it to the exact height of the target, then use the slider to adjust desqueeze until the target is exactly as wide as the squircle.
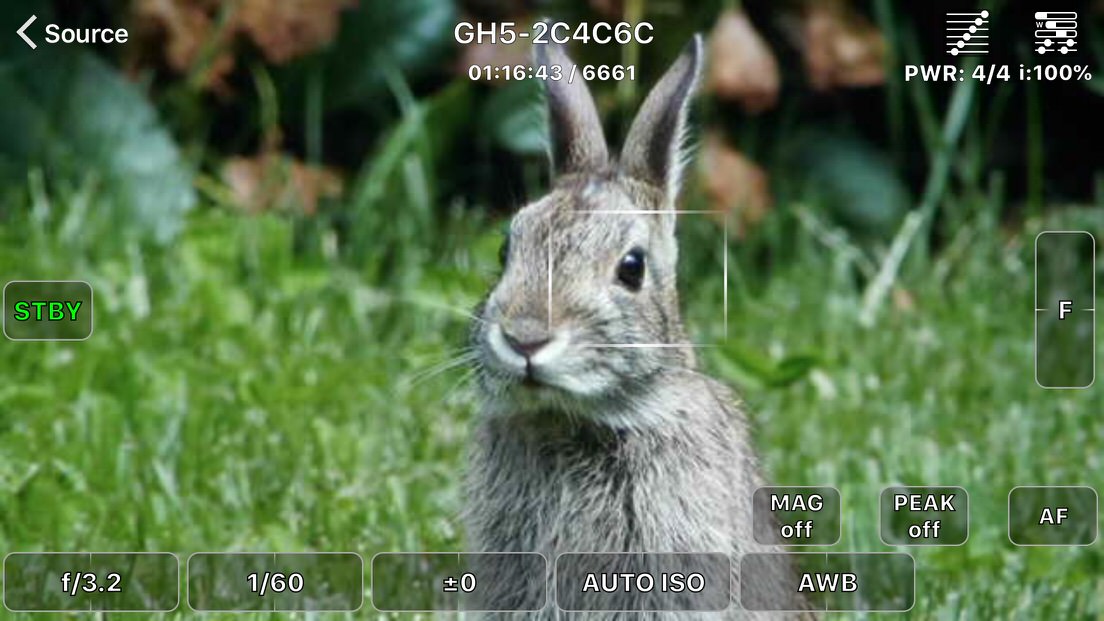
Camera Controls
Canon, Fujifilm, Panasonic, and Sony Wi-Fi cameras are supported with a basic set of onscreen controls for exposure, color, focus, and zoom. By default, tapping the screen hides the controls; tapping again brings the controls back (you can turn this off in the Hide settings). Depending on the camera’s operating mode and on-camera settings, different controls will be shown at different times, and the available control options will change. If Camera Controls are turned off in Settings, camera controls will be visible, but not adjustable.
Some cameras report storage and power information. If so, storage space is shown at the top center of the picture. Depending on the camera and the shooting mode, you may see time remaining, photos remaining, both time and photos remaining, or a simple countdown number: when it gets to 0, your storage is full.
Power is shown as a percentage (PWR: xx%), PWR: X/Y (X bars of battery remaining out of Y bars total), or PWR: ext if external power is reported. (Your iDevice's power may also be shown, as i:xx% or as iPWR:xx%.)
Some Canons send audio level info over Wi-Fi when in movie mode. FieldMonitor displays a level meter for these cameras below the power readout. The level meter has markings at -20, -18, and -12 dBFS.

- Tap-to-focus: If focus area information is available, it is shown onscreen as a rectangle or a crosshair depending on focus mode settings. In some focus modes, no focus area is shown. Tap and hold to move it where you want it to be (with Canons and Panasonics, you can also drag it). In some Panasonic modes, you can pinch it larger or smaller.
-
- The focus area on a Fujifilm or Sony can only be moved in FieldMonitor in photo mode, if at all (except with the Sony A7Siii; see below).
- Focus areas are not shown for Ctrl w/ Smartphone Sonys, nor for Fujifilms in video mode. When not shown, tap-to-focus isn’t available (except with the Sony A7Siii; see below).
- Canons in manual-focus mode show the image magnification area instead of the focus area. Some Canons let you move it; other do not. To move it on those Canons, switch the lens to AF, move the focus point to where you want magnification to occur, then switch back to MF.
- When you move a focus area, the camera automatically refocuses — not always successfully!
- Some focus modes automatically magnify the focus area when you move it. Tap Mag (if available) or another control to turn magnification off, or disable focus magnification in the camera’s menus.
- Tap-to-focus works when FieldMonitor's camera controls are hidden, so you can tap-to-focus on a decluttered screen.
- Panasonics: In Pinpoint AF, tap and hold to move the focus area. Drag to move the focus point inside the focus area.
- Panasonics: Custom Multi areas are shown as a rectangle surrounding all the selected focus points. Custom multi areas cannot be moved over Wi-Fi; you need to move them on the camera directly.
- Sony A7Siii: tap and hold in movie mode to set the focus target. Tap-to-focus works in both AF and MF modes. (There is no focus area shown in FieldMonitor, but the camera will attempt to refocus where you tap and hold. In MF, the AF button will appear while the camera refocuses.) Note that the extreme left and right edges of the picture are outside the A7Siii's focusable area and the camera will instead focus using a target area closer to the center of the screen. Tap-to-focus is ignored in still-photo modes.
- Since contrast-detection AF always hunts, I recommend turning continuous AF off in the camera’s menus for cameras that use contrast detection. Then tap and hold the new focusing point whenever a focus change is needed. In my experience, 1-Area AF and Tracking AF are the least problematic Panasonic AF modes for video work; your experience may differ.
- STBY | • REC and/or PHOTO buttons on the left side of the screen let you start and stop recording and grab still photos.
-
- Depending on the camera and its mode, you may see STBY, or PHOTO, or both.
- When you tap •REC to stop recording, it may take a few seconds before the status changes to STBY, while the recording is being saved. The recording-time indicator in the upper-left corner of the image will stop increasing while this happens. If the recording-time indicator keeps counting up, the record-stop command wasn’t received by the camera; tap •REC again.
- Sometimes PHOTO is shown while recording: some cameras allow grabbing stills during video capture. However FieldMonitor can't always determine when photo capture is allowed, so you should test this feature before depending on it.
- PHOTO changes to OK when reviewing a Canon or Fujifilm photo. Tap it to return to live view.
- PHOTO changes to BULB when some cameras are set to their Bulb mode. Tap BULB to open the shutter, and tap it again to close it.
- When some cameras are set to continuous-shooting modes, tapping PHOTO starts capture. The button changes to STOP; tap it to stop continuous shooting.
-
PHOTO MODE |
VIDEO MODE toggles the camera between photo and video modes. This control is only available for some Fujifilm cameras.
- Z is a zoom “rocker control” on the right side of the screen. Press the top half to zoom long, the lower half to zoom wide. This control is only available for power-zoom lenses on Panasonics or Sonys.
- F is a focus “rocker control” on the right side of the screen. Press the top half to focus far, the lower half to focus near. This control is only available in manual-focus mode with cameras that support remote manual focusing.
-
- If you keep the rocker pressed, the focus change will accelerate after a short time. To make multiple fine focus adjustments, tap the rocker repeatedly instead of holding it down.
- Aperture, shutter, exposure compensation, white balance, and color temperature appear at the bottom of the screen. When they're adjustable, they show a “rocker control”: press the left side to decrease the value, press the right side to increase it.
-
- Color temperature is only shown when the camera is set to a preset color-temperature mode. Not all cameras report their color temperatures.
- Color temperature is not adjustable over Wi-Fi on the GH5.
- Exposure compensation may only be shown on Sonys when it is adjustable.
- On Panasonics, exposure compensation doubles as the “exposure meter” readout when the camera is in M (full manual) mode.
- Rocker controls “accelerate” if you hold them down. To make multiple fine adjustments, tap a rocker repeatedly instead of holding it down.
- Canon, Fujifilm and Panasonic cameras are adjusted continuously when a rocker is tapped or held down.
- Sony cameras are only adjusted on single taps and when a rocker is released after being held down. After you tap or release a rocker, you may see the rocker's setting change back to its original value briefly, before the camera processes the rocker's new setting.
- Panasonic synchro-scan shutter speeds don’t always change with a single tap, or change by the same amount. Just keep tapping.
- If the HUD is enabled, the rocker's setting appears in the center of the screen while you’re adjusting it.
- The exposure compensation rocker may appear blank in some conditions on Fujifilm cameras, and may or may not function depending on other settings. For example, using non-electronic lenses on an X-T3 in video shutter-priority mode, it will work when auto ISO is selected, but not with fixed ISO settings.
- PinP | FULL (Panasonics only) shows the current image-magnification mode. Press to toggle between modes. This control is only available in manual-focus mode.
- MAG (Canons and Panasonics only) lets you toggle image magnification on or off. This control is only available in AF mode on Canons, and MF mode on Panasonics.
- AF is used to refocus (with controllable lenses only). With some cameras, AF flashes green when AF succeeds and red when it fails.
-
- With Canons, AF also turns metering on. When Canons are in manual focus mode, AF turns into METER. METER usually turns camera metering on, but not always: some cameras ignore it while recording. Half-pressing the camera’s shutter button always turns metering on.
- With Panasonics, AF works in manual-focus mode only; in autofocus modes, simply move the focus area slightly, and the camera will refocus.
- With Sonys, the camera’s “AF w/ shutter” setting must be On for the AF button to work.
- On some Sonys, AF changes to Cancel Lock when focus is locked to a point; you must take a picture, move the focus point, or press Cancel Lock before you can operate other camera controls. On other Sonys, the AF button may appear in MF mode: pressing it disables other controls, but does nothing useful. Press it again to re-enable controls.
-
Cancel Track appears when AF subject tracking is active and can be canceled remotely (Panasonics, some Sonys).
- Turn on peaking with the PEAK button (Panasonics only). The peaking signal may not display over Wi-Fi while recording is in progress. Peaking is only available in manual-focus modes. Use FieldMonitor's Focus Assist for any camera to see edge detail in all focusing and recording modes.
About Luma Levels
Canon and Fujifilm cameras record both photos and video clips with levels ranging from -7% to 109% (“full swing” or “data range” signals).
Sony cameras always record video clips with levels ranging from 0% to 109%, and FieldMonitor’s ’scopes are calibrated to that range. Sony’s HDMI output is also always 0%–109% when recording video, and in standby when the camera is in movie mode. In still-photo mode, the HDMI range is from -7% to 109%, but it changes to 0%–109% as soon as you start recording. FieldMonitor’s ’scopes always display the image in the 0%–109% range, so that the ’scopes can be used for previewing video levels regardless of what mode the camera is in.
For Panasonics, things are considerably more complicated...
Panasonic video can be encoded with a variety of “Luminance Levels”, spanning different numerical ranges within their 8-bit (or 10-bit) signals. For example, an 8-bit “full swing” signal records black at a level of 0 and white at a level of 255, just like a JPEG image does. A “studio swing” signal puts black at a level of 16 and white at 235, the black and white levels of a Rec.709 video signal. It's also common to find “extended range” signals with black at 16 and white at 255.
In 10-bit modes, 0–255 translates to 0–1020 or 0–1023; 16–235 is 64–940; and 16–255 is 64–1020 or 64–1023 (Panasonic displays it as 1023 in the GH5’s menus). FieldMonitor always uses 8-bit terminology regardless of how your camera is set up.
Panasonics default to Luminance Levels 16-255 when recording video. If your camera does not have a Luminance Levels setting, it uses 16-255.
Cameras like the GH4 and GH5 offer all three choices when set to MOV format. In AVCHD or MP4 modes, only 16–235 and 16–255 are available; in V-Log L only 0–255 is used. Other cameras like the G7 offer 0–255 and 16-255 options.
When shooting stills, and (usually, but not always) when in Creative Video Mode but not recording, the camera uses 0–255.
Are we having fun yet?
Unfortunately, Panasonics don’t tell Wi-Fi apps which Luminance Levels are in use. In addition, the camera’s images transmitted over Wi-Fi will use different levels settings in standby and in record, and those levels will vary depending on whether the camera is in Creative Video Mode and whether it’s feeding video over an HDMI connection—and the camera doesn't communicate that information, either. Instead, you have to manually set FieldMonitor to match how your camera is set up (yes, this is an annoying, confusing hassle: I'm sorry, but there’s nothing I can do to fix it other than to give you manual controls).
FieldMonitor offers four luma ranges in its Levels settings, so that the measurements made in standby match those made while recording. These settings tell FieldMonitor how to adjust the Wi-Fi image so that its levels—and those of the ’scopes and false-color displays—are always correct:
- 16-235: use this when your camera is set to Luminance Levels 16-235 or 64-940. Blacks fall to 0% on the waveform monitor, and whites peak at 100%.
- 16-255: Use this when your camera is set to Luminance Levels 16-255 or 64-1023, or when your camera doesn't offer you the choice. Blacks fall to 0% on the waveform monitor, and whites peak at 109%.
- 0-255: Use this when your camera is set to Luminance Levels 0-255 or 0-1023. Blacks fall to -7% on the waveform monitor, and whites peak at 109%.
- Legal: Use this when your camera is set to Luminance Levels 0-255 or 0-1023. Blacks fall to 0% on the waveform monitor, and whites peak at 100%. Legal shows you the same levels as an internally-recorded file displays in most editors; MOV files with 0–255 encoding include metadata telling a decoder to display the image as legal-range video, not full-range video.
-
- If you're shooting log, make sure that 0–255 is selected for correct results. VLog LUTs expect data using the 0–255 range; selecting Legal range will show incorrect results.
In addition, you use two switches to tell FieldMonitor whether the camera is in Creative Video Mode (the mode-dial setting with the movie camera), and whether or not you’re feeding live images out HDMI.
If the settings on the camera and in FieldMonitor don’t match, image brightness and contrast, ’scopes, and false-color overlay will change when you go from standby into record or vice versa. (You can test your settings by aiming the camera at a high-contrast scene with clipped whites and deep blacks and watching the WFM as you start and stop recording: the highest and lowest levels seen on the WFM will not change when going between STBY and REC if FieldMonitor is set properly).
If you're worried about mistakes, set any of FieldMonitor’s ranges other than Legal. The ’scopes and false-color will be correct whenever the camera is in record mode (though they may be incorrect in standby mode) and they'll show you exactly what levels are being recorded or sent out HDMI.
About LUTs
FieldMonitor has several built-in LUTs:
- HLG to 709 BBC: Hybrid Log Gamma / Rec.2020/2100 to Rec.709(800%) / Rec.709 gamut, with HLG “white” at 73% as the BBC recommends
- HLG to 709 NHK: Hybrid Log Gamma / Rec.2020/2100 to Rec.709(800%) / Rec.709 gamut, with HLG “white” at 50% as the NHK recommends
- S-Log2 to 709: Sony S-Log2 / S-Gamut to Rec709(800%) / Rec709 gamut
- S-Log3 to 709: Sony S-Log3 / S-Gamut3 to Rec709(800%) / Rec709 gamut
- S-Log3cine to 709: Sony S-Log3 / S-Gamut3.Cine to Rec709(800%) / Rec709 gamut
- V-Log to 709: Panasonic V-Log / V-Gamut to Rec709(800%) / Rec709 gamut
These LUTs are designed for contrasty, colorful monitoring with a standard response curve:
- 0% black is 3% on the WFM.
- 18% gray is 44% on the WFM.
- 90% white is 89% on the WFM (90% white is the whitest chip on a chip chart).
All these LUTs were built in LUTCalc. If you rate your camera at a lower EI, overexposing log to reduce noise, you may want to build custom versions of these LUTs with an EI shift to compensate:
- Use the same Rec (input) and Output Gammas and Gamuts.
- Add the Stop Correction you need, for example -1 if you rate the camera at half the nominal EI (put another way, if you open the aperture one stop compared to the nominally correct value).
- Make sure that Input Range and Output Range are both 109%! This is very important: some gammas automatically select a different range, and mismatched ranges will change the LUT’s contrast and black and white points.
One additional LUT is supplied for backwards compatibility with older versions of FieldMonitor:
- VLog to V709 forV35 ver100: Panasonic V-Log / V-Gamut to VariCam V709 / V-Gamut
This is Panasonic's standard V-Log LUT. It’s a lower contrast, lower saturation LUT designed more as a starting point for grading than for monitoring.
LUTCalc transfer curves:


More LUTs
Sony Standard S-Log3 LUTs — download them (1.7 MB)
- S-Log3 to Cine709: Sony S-Log3 / S-Gamut3 to Sony Cine+709 / Cine+709 gamut
- S-Log3 to LC709: Sony S-Log3 / S-Gamut3 to LC709 / LC709 gamut
- S-Log3 to LC709A: Sony S-Log3 / S-Gamut3 to LC709A / LC709A gamut
- S-Log3cine to Cine709: Sony S-Log3 / S-Gamut3.Cine to Sony Cine+709 / Cine+709 gamut
- S-Log3cine to LC709: Sony S-Log3 / S-Gamut3.Cine to LC709 / LC709 gamut
- S-Log3cine to LC709A: Sony S-Log3 / S-Gamut3.Cine to LC709A / LC709A gamut
These are the standard S-Log3 LUTs, rebuilt for FieldMonitor using LUTCalc. They work better than the Sony-supplied LUTs as (a) the Sony LUTs are MLUTS expecting an output range of 100%, not 109%, and (b) the stock Cine+709 .cube files are too big to import into FieldMonitor.
LUTCalc transfer curves:


More Info
About Sony Remote Control Types
Different Sonys have different ways of providing remote control over Wi-Fi: Smart Remote, Ctrl w/ Smartphone, Smartphone Connect, or PC Remote. The following descriptions are accurate for the cameras I have tested; other cameras may behave somewhat differently.
“Smart Remote” cameras use an on-camera app for remote control, either Smart Remote Embedded (installed by default) or Smart Remote Control (a free download from the PlayMemories Camera App store). “Smart Remote” cameras include the A5100, A6300, A6500, A7ii, A7Rii, A7S, and A7Sii.
You start remote control by launching the Smart Remote apps from the camera's Application List menu. The app takes over the camera and provides a limited subset of the camera's functions while it runs. For example:
- You can’t use Picture Profiles, so you can't shoot in S-Log.
- You can't use S&Q motion (high frame rate recording).
- On some cameras, you can’t use the Memory Recall positions on the mode dial. On others, you can use the Memory Recall positions but you can't adjust their controls.
- You can use the MENU button, but the menus are very limited when Smart Remote is running.
- You can't use the PLAY button on the camera while Smart Remote is running.
- Depending on camera mode, focus areas are shown in FieldMonitor and (in some modes) can be repositioned by long-pressing where they should be.
- The camera’s Face Detection AF works during Wi-Fi remote control.
When Smart Remote Embedded is used, the only camera adjustment you get over Wi-Fi is exposure compensation (you can still control shutter, iris, ISO, and white balance on the camera itself and see these readouts in FieldMonitor, but the only remote adjustment you have is exposure compensation). Smart Remote Embedded does not send storage space or battery level data over Wi-Fi, so you have to look at the camera's monitor for that information.
When Smart Remote Control is installed, you can adjust shutter, iris, ISO, and white balance remotely. Smart Remote Control sends storage space and battery level data over Wi-Fi, and FieldMonitor displays that information at the top of the picture.
“Ctrl w/ Smartphone” and “Smartphone Connect” cameras have remote control as part of the camera firmware. There is no Application List menu, and camera apps can’t be installed. Ctrl w/ Smartphone cameras include the A7iii, A7Riii, A7Siii, A9, and A99ii; the A7iv is a Smartphone Connect camera.
You start remote control using the “Ctrl w/ Smartphone” or “Smartphone Connect” submenu in the camera’s Wireless or Network menu. While remote control is running:
- You can use Picture Profiles and shoot in S-Log (if your camera has S-Log).
- You can use S&Q motion (high frame rate recording).
- Memory Recall positions on the mode dial can be used and their controls can be adjusted.
- If you use the MENU or PLAY buttons on the camera, the Wi-Fi connection may be dropped and you will have to reconnect. Adjust menu settings before starting a remote session. (The Fn menu is available while in remote mode, so you can still use the Fn button without dropping the connection.)
- Focus areas are not shown onscreen and cannot be repositioned in the app for most cameras. Some, like the A7Siii, allow tap-to-focus in movie mode, but the focus area is not shown.
- Face Detection AF may not work in high frame rate S&Q motion or in 4K, when “Ctrl w/ Smartphone” is on, HDMI is connected, or proxy recording is enabled.
These cameras let you adjust shutter, iris, ISO, and white balance remotely. However, no storage space or battery info is sent over Wi-Fi for many of these cameras, so you must look at the camera’s monitor for this information.
If your camera appears in FieldMonitor with a * after its name (like ILCE-7RM4*), you will see storage space and battery info. FieldMonitor’s PHOTO button behavior depends on the Sony* AF w/ Shutter setting. If your camera’s “AF w/ Shutter” setting is OFF, then FieldMonitor’s “Sony* AF w/ Shutter” settings should also be OFF.
“PC Remote” cameras work just as they do in Ctrl w/ Smartphone mode. PC Remote cameras include the A7Riv and A7Siii.
You start remote control by turning “Ctrl w/ Smartphone” off in the camera’s Wireless or Network menu, and then turning PC Remote on using “Wi-Fi Direct” or “Wi-Fi Access Point” settings.
- You must set “Still Img. Save Dest” to “Camera Only” or “PC+Camera” in the PC Remote submenu, or you will not be able to take still photos using FieldMonitor. Unless you are also using Sony's remote-control software, set it to “Camera Only”, as FieldMonitor ignores the images that the camera sends when PC is one of the destinations.
Behavior is the same as in Ctrl w/ Smartphone mode except:
- Live-view images are 1024x576 in PC Remote mode instead of 640x360 in Ctrl w/ Smartphone mode.
- Live-view frame rate is lower than in Ctrl w/ Smartphone mode (around 16fps in good conditions).
- You can connect using a separate access point (in “Wi-Fi Access Point” mode). A separate access point lets you work at greater distances, with less chance of interference from other sources (most standalone access points have much stronger radios than the camera has). You can also connect multiple cameras to the same access point, and switch between them in FieldMonitor without changing the network you’re connected to.
© 2025 Adam J. Wilt. Last updated 2025-06-26