
How To...
- Calibrate the meter: shoot a gray card or other solid target with
Cine Meter and your most trusted reflected meter, DSLR, or video camera. Adjust the Meter
Compensation control on the Settings and Info
page to make Cine Meter’s readings match those of your reference device. (The camera
picture is unaffected by any compensation you set; the camera always sets its own
exposure and its waveform and false-color levels may not match those the light meter
reading would indicate!)
- Check exposure: aim the camera at the scene, and read off the
exposure (use the spot meter if necessary to narrow down the area of interest). You can
tap
 to freeze the reading, and then vary ISO
and shutter to see how aperture changes even if you are no longer pointing the camera at
the scene.
to freeze the reading, and then vary ISO
and shutter to see how aperture changes even if you are no longer pointing the camera at
the scene. - Compare exposures: aim the camera at a gray card or other reference
target, and tap . Cine Meter will hold that
exposure, letting you walk around the set and look at the waveform monitor and
false-color displays to compare light levels to your reference.
- Compare white balances: aim the camera at a white or gray card under
your reference lighting, and tap
 to lock the
white balance. Cine Meter will hold that white balance, and you can use the RGB mode of
the waveform monitor to examine the color balance as you walk around the set. (The range
of color temperatures and lighting spectra that Cine Meter will properly white balance to
is entirely dependent on the camera in your iDevice: some accommodate a wider range of
white points than others do.)
to lock the
white balance. Cine Meter will hold that white balance, and you can use the RGB mode of
the waveform monitor to examine the color balance as you walk around the set. (The range
of color temperatures and lighting spectra that Cine Meter will properly white balance to
is entirely dependent on the camera in your iDevice: some accommodate a wider range of
white points than others do.)
- Check lighting evenness: when you need flat, even lighting (on a greenscreen, white cove, test charts, or flat art), Cine Meter’s waveform monitor shows you the relative light levels across the camera’s field of view in a single glance. It’s a lot quicker to use the waveform monitor than to spot-meter several points across the field of view, or to take multiple incident readings to get the same information.
- Compare color temperatures: using
and the RGB waveform monitor makes it very simple to compare LCD displays, different LED
lights, or any other combinations of radiant or reflected lights. If you use
on a known-good source (or a white card illuminated by it), the differing RGB levels when
looking at another source will indicate how you have to color-correct it to make it
match, without the subjectivity of the human eye.
- Launch Cine Meter from a different app: to open Cine Meter from an automation app like Workflow or Launch Center Pro, use the URL scheme “cinemeter://”.
Examples
(These examples were shot using an early version of Cine Meter on an iPod touch 4G running iOS 6, so they show iOS 6’s look-and-feel and older toolbar buttons, but the ideas and procedures are the same with the current version... which still runs on iOS 6 if you have an older device.)

Shooting this scene in matrix mode captures most of the tonalities but leaves the subject a bit underexposed.

Switching to spot mode metering and putting the “spot” on the painting bring up the
levels: a stop brighter on the meter, about a stop and a third in the picture and on
the waveform (this is not unusual; the meter and the displays don’t always track each
other, as explained here).

Using Cine Meter’s spot mode, we can get a reading on the backlit cat and avoid too much influence from the bright sky and the low winter sun.

False Color mode lets us double-check light levels and gives us a graphic portrayal of our danger zones. The green shows us that the cat is nicely placed around the midgray tones; the darkest bits of the shaded foliage to the right are liable to lose shadow detail, and the sky... well, the sky is going to clip, no two ways about it. If I planned to use an ND grad on this shot, I could hold it in front of Cine Meter and see right away what sort of difference it would make.
It’s important to note that the pictures and the light
meter don’t track each other precisely, due to the particular exposure-level
programming in your iDevice’s camera module.
It just so happens that in this example my midgray level is smack-dab
on the cat at this meter reading, but practically speaking, I’d take a meter reading
for my production camera, then I’d separately “trick” the iPhone's camera into putting
my midgray tones where I wanted them (by tilting the camera more towards the bright sky
or the dark foliage until the exposure changed to what I wanted). I’d then lock that
exposure and look at the false-color and waveform displays to see what the rest of the
scene is doing.

Here, our subject is lit from one side with a KinoFlo Diva-lite 400. The waveform monitor
shows how much exposure variation there is side-to-side (the tilt in the green and blue
lines) as well as top-to-bottom towards the edges of the image (the fattening-up of the
green and blue lines at the sides of the waveform monitor image).
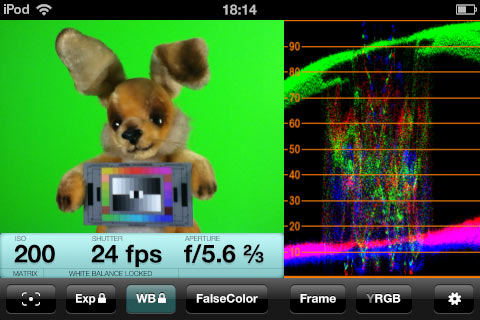
It’s interesting to note that even though I haven’t locked white balance in this shot, the
camera has auto-balanced on the rabbit’s white fur (and/or the rabbit’s tan fur
counterbalances the greenscreen’s green in the camera’s tiny mind), so the picture looks
reasonably correct.
The waveform monitor shows that the blue reflected by this particular greenscreen (a sheet
of green poster board bought at an art store) is quite strong; it’s only about a stop under
the green, though red reflection is admirably absent.
The scene looks fine to the eye—it’s obvious which parts are rabbit and which parts are greenscreen—but Cine Meter shows us how sloppy the green lighting is. Yes, I’m sure we could pull a key in one pass, if we didn’t care about fine detail... but if we don’t even out the lighting, our VFX guy will be very cross with us.

False Color mode confirms that this exposure is probably OK, even if the balance isn’t
great (you’ll observe that the meter reading is ⅓ stop darker than in the previous
screenshot, even though the image is a little brighter. Remember what I said I said about
the camera exposure not always tracking the meter reading?). There’s a clipped specular
kick in Barney’s eyelight; practically speaking, this sort of thing is likely to happen
with most shiny speculars as well as with lights in the shot.
If I’d put the waveform monitor in Y mode, we’d see the greenscreen’s luma level along the left side hovering around 41% or so: the false-color green level defaults to 41% ± 2.5%.

Now I’ve filled from the left with another Diva-lite 400. The side-to-side balance is just fine, though I still need to work on the greenscreen shadowing at the edges (it’s due to our subject being close enough to the screen that his diffuse shadows are falling on it. I’d move him forward, but he’d fall off the table. I’m also seeing some slight hotspotting at the upper corners due to the poor positioning of my lights, something the waveform monitor makes immediately apparent even if my eyes glossed over that half-stop difference. In microbudget production, this sort of sloppiness is regrettably common. Cine Meter makes it harder to overlook).
The blue is still rather toasty, but I’m using daylight tubes in the Kinos. Putting
tungsten-balanced light on this backdrop might help. Even with the daylight tubes, the
separation is tolerable; the VFX guy won’t have to work overtime on this key.

A week later, with more money in the budget ($5.49), I try again: this time I get clever,
and use Cine Meter to compare potential greenscreen material before I set up my
“studio”. That middle material has much better separation (the left green is the same card
I used before, though this time I’m lit with 2900K KinoFlos).
Immediately I see a cleaner and purer green, though my background illumination is kinda
sloppy... again.

Cine Meter makes it easy to see when it’s evened up. I’ve put the waveform monitor in YRGB
mode, so I can see the overall luma values as well as the color component levels.

If I turn on FalseColor, my levels are OK, but the false colors aren’t
helping me much at their default settings.

The green “midtone” level defaults to 41%, but here I drag it to 75% to highlight the
background lighting level.

That makes it a lot easier to see when I have things better balanced.

To simplify things even further, I use 1 Line mode on the ’scope. By
tilting Cine Meter up and down, I can scan that line across the entire vertical extent of
the scene and see precisely whether my remaining imbalance is due to shadows at the top of
the screen or the bottom.
This is a much better keying setup than I had before; the VFX guy can pull a key
in his sleep. That’s $5.49 well spent... thanks to Cine Meter!

Big Pig and friend perch on a cove painted with Composite Components Digital Green,
side-lit with a 10K fresnel, in this photo from Don Craig. (I have Cine Meter’s camera data
overlay turned on, just for fun.)
There’s good separation between the green and the red and blue with this paint, so the VFX
folks will be happy.
ChromaDuMonde® charts seen in Cine Meter screenshots used with kind permission of DSC Labs. DSC Labs is not responsible for any images viewed with Cine Meter, or how they appear in Cine Meter's pictures.
© 2013-2018 Adam J. Wilt. Last updated 2018-05-24