
How To...
- Take reflected readings
- Take incident readings
- Change between aperture- and shutter-priority
- Use Difference Measurement
- Use Lumu color trim
Visual Checks:
- Check exposure
- Compare exposures visually
- Compare white balances visually
- Check lighting evenness
- Match color temperatures
visually
- Make a “Lenny Hat” for incident metering
- Choose back camera for incident metering
- Calibrate the exposure meters
- Calibrate the color meters
- Save and restore calibration
- Adjust Brightness Correction
- Run in “pure” measurement mode
- Take reflected readings:
Tap the camera button
 to select the view from the back camera or the front camera as
desired. Cine Meter II will measure the exposure over the entire image
shown.
to select the view from the back camera or the front camera as
desired. Cine Meter II will measure the exposure over the entire image
shown.
Tap the spot meter button to turn on the spot metering frame and measure only the area inside
that frame.
to turn on the spot metering frame and measure only the area inside
that frame.
You can zoom the camera on most iDevices: drag the picture up or to the right to zoom in, or left / down to zoom out. Zooming the camera automatically turns on spot metering.
Freeze the reading by tapping on
the toolbar, then tapping anywhere on the screen.
on
the toolbar, then tapping anywhere on the screen.
To capture a screenshot, tap and hold the picture 1 second—the background will flash white when the image is captured.
By default, Cine Meter II calculates aperture: aperture “floats” as the light changes and as you adjust other settings. You can float shutter, ISO, or ND instead. Tap and hold the value you want Cine Meter II to calculate until its background turns gray, and it will float with the changing light. For example, you can float ND: set your desired shutter, aperture, and ISO, and see what ND filter you'll need.
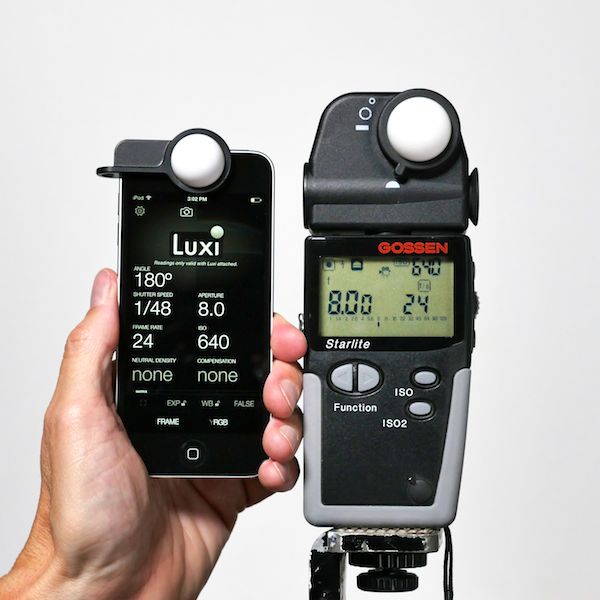
- Take incident readings:
Use diffusion or a Lumu
Lite attachment for incident readings.
Note: only Lumu Lite (headphone-jack version) is supported, not Lumu Power (Lightning-port version).
After enabling Incident Metering or Lumu Lite in Help & Settings, tap the camera button until the incident-reading screen is shown: “Incident Metering” will appear when
incident metering is selected; “Lumu” will appear when Lumu is chosen. Incident readings are valid only when the Incident Metering or Lumu message appears onscreen and the corresponding attachment is used.
until the incident-reading screen is shown: “Incident Metering” will appear when
incident metering is selected; “Lumu” will appear when Lumu is chosen. Incident readings are valid only when the Incident Metering or Lumu message appears onscreen and the corresponding attachment is used.
When using diffusion, cover the camera with a Lenny Hat, Luxi photosphere, or other diffusion. The incident metering overlay is semitransparent so you can see when you have the diffusion properly positioned over the camera. If your iDevice has multiple back cameras, choose the camera (typically the topmost one) that lets you add diffusion easily, without covering other cameras.
(On faceID devices, Cine Meter II’s screen display moves away from the camera end of the device when diffusion is enabled, so the diffusion attachment won't cover useful information.)
When using Lumu, plug the Lumu into the headphone jack.
Freeze the reading by tapping on the toolbar, then tapping anywhere on the screen.
To capture a screenshot, tap and hold the picture 1 second—the background will flash white when the image is captured.
- Change between aperture- and shutter-priority: Cine Meter II normally works in shutter-priority mode:
aperture “floats” as the light changes and as you adjust other
settings. You can float shutter, ISO, or ND instead. Tap and hold the
value you want Cine Meter II to calculate until its background turns
gray, and it will float with the changing light. For example, you can
float ND: set your desired shutter, aperture, and ISO, and see what ND
filter you'll need. If you tap and hold shutter to float it, you’ll have traditional aperture-priority metering, where shutter varies with the light.
- Use Difference Measurement:
when the full-screen EXP LOCK button is shown, use the DIFFERENCE
MEASUREMENT switch in the top left corner to control difference
measurement.
- When Difference Measurement is off, locking exposure locks the camera, so you can visually compare exposures.
- When Difference Measurement is on, the camera is not locked, but varies its exposure as needed to measure changing light.
Exposure difference is shown on the left of the picture, as exposure values (EV, stops) above or below the locked exposure. If the difference exceeds your warning levels, the readout’s background turns red for overexposure or purple for underexposure. Adjust the warning levels in Settings.
Color difference is shown on the right side of the WFM, as correction gels needed to match the current light to the locked values: CTO or CTB for color temperature, +G or -G (plusgreen or minusgreen) for tint. Tap the color difference values to toggle between gels and raw differences in Kelvins and CC units.

The color corrections shown are approximate, and should always be verified by looking at the corrected light using your production camera!
Tint correction values shown are appropriate for full-spectrum sources. With fluorescents, LEDs, and other “discontinuous spectrum” sources, you will typically need 1/2 to 2/3 of the tint correction shown. If you prefer, you can adjust Tint Gain to show -15 to -20 for a minusgreen gel under tungsten instead of -30, and the suggestions are more likely to be correct under the sources where you need tint correction in the first place.
- Calibrate the exposure
meters: Each “sensor” has its own calibration: front spotmeter,
back spotmeter, front incident meter, back incident meter, and Lumu. Each
position needs to be calibrated separately.
You can calibrate all meters using the iDevice’s back camera to get to work quickly. You can also follow the same procedure, but use a separate, trusted light meter instead of the back camera for the initial reading, for better accuracy.
What follows is a step-by-step for calibrating an individual meter.
The best way to calibrate is to measure Cine Meter II against a known-good reference meter: an accurate reflected light meter for front and back camera calibrations, and a proper incident meter for incident and Lumu calibrations. If you don't have access to another light meter, you can use the light meter in your DSLR or video camera, but you may find you have to manually adjust the results a bit by trial and error, since camera exposure often differ from the “correct” exposure value, as described here.
Ajust the COMPENSATION control on Cine Meter II's main screen until Cine Meter II's exposure reading matches your reference. Then press the Cal... button on the COMPENSATION slider to set the calibration:

Hold Cine Meter II in portrait (vertical) orientation to see the Cal... button. It doesn't appear in landscape (horizontal) orientation. With Cine Meter II version 1.4 or earlier, there is no Cal... button; you’ll have to manually add the COMPENSATION value to your calibration in Help & Settings, and then reset COMPENSATION to 0 when you're done.
Here's a step-by-step picture guide.
For the back spotmeter, shoot a gray card or other solid, evenly-lit target with Cine Meter II and your most trusted reflected meter, DSLR, or video camera. Use the Cal... button, or adjust the Back Camera Calibration (in Meter Compensation, on the Help & Settings page) to make Cine Meter’s readings match those of your reference device. (The picture monitor and waveform monitor are unaffected by any compensation you set; the iDevice’s camera always sets its own exposure).
For the front spotmeter (the camera that looks at you from the front of your iDevice), either stand next to your gray card so you can see the screen while aiming the camera at it, or use a large, evenly-lit wall as your target, face away from it, and aim the front camera over your shoulder. Shoot the same target with your reference reflected meter or other camera.
For incident meter calibration, enable front or back incident metering on the Help & Settings page, attach the diffuser, and tap the camera button
until the Incident Metering screen appears. Then compare Cine Meter II with another
incident meter. If you don't have access to another incident meter,
take a reflected-light reading from an 18% neutral gray card, and set
Cine Meter II's incident calibration about 1/2 stop wider (less sensitive,
-1/2 stop) than your reflected reading indicates.
Note: different diffusers are calibrated the same way, but they are not interchangeable. Plain white paper and Lee 216 absorb different amounts of light and affect color differently; Luxi For All gives readings that are about half a stop brighter than the original Luxi. If you change your diffusion, you'll need to recalibrate Cine Meter II.
Lumu calibration is done just like incident calibration, only using Lumu. For the most precise calibration, set Lumu Color Trim for the approximate color temperature of your calibration lighting setup.
In any incident mode, adjust calibration using the aperture readout, not the lux/fc readout. The compensation control doesn't affect lux/fc, so you won't see lux/fc change as you adjust compensation. After you calibrate with a compensation, lux/fc will change accordingly, but not before you have set the calibration. - Make a “Lenny Hat” for incident metering:
- Choose back camera for incident metering:
If your iDevice has multiple back cameras, you can choose which one to use for incident readings. Choose the camera at the top left corner of the iDevice, so that your diffusion covers it without blocking other cameras.
In Help & Settings, scroll down to Back Incident Camera and tap Choose. Cine Meter II will display a camera picker control. Cover the camera with diffusion (or your finger) and view the picture as you select each camera. Choose the one showing the diffused image (or the close-up of your finger).
If you change the camera being used, be sure to recalibrate exposure and color.
- Check exposure: aim
the camera at the scene, and read off the exposure. Use the spot meter
if necessary to narrow down the area of interest: tap the spot meter
button
 or drag the
picture up or right to zoom the spot meter. You can tap
to freeze the reading, and then vary the exposure settings even if you
are no longer pointing the camera at the scene. Note that locking
exposure also locks the color reading (if shown; requires iOS 8 or
higher).
or drag the
picture up or right to zoom the spot meter. You can tap
to freeze the reading, and then vary the exposure settings even if you
are no longer pointing the camera at the scene. Note that locking
exposure also locks the color reading (if shown; requires iOS 8 or
higher).
- Compare exposures
visually: aim the camera at a gray card or other reference
target, and tap . Make
sure DIFFERENCE MEASUREMENT is off
and tap the screen to lock exposure. Cine Meter II will lock the
camera’s exposure, letting you walk around the set and look at the
waveform monitor and false-color displays to compare light levels to
your reference.
- Compare white balance
visually: aim the camera at a white or gray card under your
reference lighting, and tap
 to lock the white balance. Cine Meter II will hold that white balance,
and you can use the RGB mode of the waveform monitor to examine the
color balance as you walk around the set. (The range of color
temperatures and lighting spectra that Cine Meter II will properly
white balance to is entirely dependent on the camera in your iDevice:
some accommodate a wider range of white points than others do.)
to lock the white balance. Cine Meter II will hold that white balance,
and you can use the RGB mode of the waveform monitor to examine the
color balance as you walk around the set. (The range of color
temperatures and lighting spectra that Cine Meter II will properly
white balance to is entirely dependent on the camera in your iDevice:
some accommodate a wider range of white points than others do.)
- Check lighting evenness:
when you need flat, even lighting (on a greenscreen, white cove, test
charts, or flat art), Cine Meter II’s waveform monitor shows you the
relative light levels across the camera’s field of view in a single
glance. It’s a lot quicker to use the waveform monitor than to
spot-meter several points across the field of view, or to take
multiple incident readings to get the same information.
Tip: many iDevice cameras vignette at wide angles—their pictures are darker at the edges than in the center—while some darken the center of the image when zoomed in slightly. For example, on iPhone 6/6Plus you may see a darker band running through the picture horizontally in portrait mode, or vertically in landscape. If you see this on your iDevice, try zooming in or out a bit to see if the brightness evens out across the frame.
Check to see if the unevenness in lighting moves when you pan or tilt the camera: if it doesn’t move, it’s the camera’s unevenness you’re seeing, not the scene’s. Instead of just holding your iDevice still, sweep it across the scene as you watch the WFM, and you’ll get a more accurate picture of how even the scene lighting is.
- Compare color
temperatures visually: using
and the RGB waveform monitor makes it very simple to compare LCD
displays, different LED lights, or any other combinations of radiant
or reflected lights. If you use
on a known-good source (or a white card illuminated by it), the
differing RGB levels when looking at another source will indicate how
you have to color-correct it to make it match, without the
subjectivity of the human eye, and with the color sensitivity of a
digital camera (so it's more likely to match your production camera’s
color sensitivity).
See various usage examples on the original Cine Meter How To... page.
- Use Lumu Color Trim:
Compared to most digital cameras and many other light meters, Lumu is
slightly more sensitive to daylight than to incandescent light, even
more sensitive to green light, and relatively insensitive to red
light.
Lumu is used worldwide without problems, since the variation between daylight (5600 K) and tungsten (3200 K) measurements is less than a stop. Lumu’s default calibration is in the middle of this range, so you can meter in most lighting conditions and always get a good reading: +/- 0.3 stop is well within the margin of error for most work. But if you need higher precision, Color Trim allows Lumu to be adjusted for light of a particular color.

With Color Trim enabled, the trim value and light color are shown.

Tapping the Lumu logo displays the Color Trim slider.
If you are outdoors on a sunny day, or working with HMI lighting, choose 5600K. Under tungsten light, use 3200K. Mixed lighting? Pick a value between 5600K and 3200K. (Late afternoon sunlight is often in the middle of the “mixed” range.)
Everything else is very much a judgement call. Fluorescents typically have a “green spike”, so adjusting Color Trim one click towards Green compared to the nominal color temperature often helps. You may want to be trimmed entirely Green on a green-lit greenscreen set; between 3200K and Red near sundown; or all the way to Red when metering on a set lit by saturated red light: think of a photographic darkroom’s safe light or an aircraft’s red-lit cockpit at night.
Color Trim isn’t required, it’s just a fine-tuning adjustment. You can meter in 99% of the lighting conditions you’ll encounter and get a perfectly good reading even if you ignore Color Trim. But if you need higher precision and consistency, Color Trim is helpful.
From Green to 3200K is only one stop. From 3200K to Red is 2.7 stops, but these are adjustments for very saturated yellowish- to reddish-colored light, not everyday lighting conditions, and when you get very saturated colored light like that you’ll want to test your exposures anyway, regardless of what meter you’re using.
- Calibrate the
color meters (requires version 1.6 or newer, iOS 8 or
higher): Color temperature / tint values are shown for incident meters, and can be enabled for reflective meters (spotmeters) in Help
& Settings. Each meter has its own
calibration: front spotmeter, back spotmeter, front incident meter, and back incident meter.
Each position needs to be calibrated separately.
You can calibrate all meters using the iDevice’s back camera to get to work quickly. You can also follow the same procedure, but use a different color meter instead of the back camera for the initial reading, for better accuracy.
What follows is a step-by-step for calibrating an individual meter. (The older, legacy color calibration workflow is shown below.)
To calibrate temperature and tint values:
- For best results, use a tungsten lamp, or an LED lamp with CRI > 97 / TCLI > 98. Calibration using other LEDs, fluorescents, HMIs, and plasmas may give inaccurate results.
- Take a color temperature reading with a trusted color meter. If you don't have a color meter, follow the self-calibration instructions to grab color using the back camera. This reading is your target color temperature for calibration.
- On the main screen, tap and hold the color
temperature and tint numbers at the top right corner of the display
until the COLOR CALIBRATION panel appears:

- In incident mode, place Cine Meter II exactly where you took the reading with the other color meter. In spotmeter mode, aim Cine Meter II at a color-neutral reflective target, placed where the other color meter took its reading. The most accurate target is a sheet of aluminum foil, crumpled and then smoothed out. A white or gray card can also be used, with a slight reduction in accuracy.
- Adjust CCT: and Tint: to your target values: use the sliders or the -|+ buttons (tip: you can preset values, then place or aim Cine Meter II as needed and tap SET). Whenever you drag the sliders or tap +, -, or SET, Cine Meter II recalibrates, so make sure your final drag or tap is under your calibration light.
- Tap the color temperature and tint numbers at the top right corner of the display again to hide the calibration panel.
Reminder: Cine Meter II recalibrates whenever you adjust the calibration controls. If you adjust the sliders or use the -|+ and SET buttons while Cine Meter II is not looking at the calibration light, be sure to tap the SET button under the calibration light as the last thing you do.
Legacy color calibration
Cine Meter II versions 4.5 and earlier used a different color calibration procedure, setting CCT and “tint gain”, but not tint. You can still use it if you prefer to adjust tint gain, however your calibration light source must not have any green/magenta tint. Turn it on in Help & Settings > SETUP > Legacy Color Calibration.
To calibrate temperature and tint values:- For best results, use a tungsten light for calibration.
If you have a recent (2016 or later) 3200K LED lamp with high
CRI/TLCI ratings you can try calibrating with it, however the calibration may not be as accurate as under tungsten. Calibration under older LEDs, fluorescents, HMIs,
and plasmas will likely give you highly inaccurate results. Many 5600K LEDs
have considerable green tint — as does daylight — and calibrating
with such a light gives inaccurate tint values.
- Take a color temperature reading with a trusted color meter
or digital camera, or assume 2750 K for household incandescent
lamps, 2900 K for high-intensity halogen lamps, or 3100 K for motion
picture tungsten lamps. This reading is your target
color temperature for calibration. A color meter or digital camera
measurement gives you the best results, but calibration with assumed
values usually works very well.
- On Cine Meter II, tap and hold the color
temperature and tint numbers at the top right corner of the display
for 2 seconds to show the COLOR CALIBRATION panel:

- In incident mode, place Cine Meter II exactly where you took the reading with the other color meter. In reflected mode, aim Cine Meter II at a color-neutral target, such as a white-balance card or neutral gray card, placed where the other color meter took its reading.
- Adjust CCT: to your target color temperature: use the slider or the -|+ buttons (tip: you can preset the color temperature, then place or aim Cine Meter II as needed and tap SET). Whenever you drag the slider or tap +, -, or SET, you save the current value as the calibration, so make sure your final drag or tap is under your calibration light.
- Tap the color temperature and tint numbers at the top right corner of the display again to hide the calibration panel.
Tint is automatically set to 0 during calibration.
Using a tungsten light and a plusgreen or minusgreen gel:
- Tap and hold the color temperature and tint numbers at the top right corner of the display to show the COLOR CALIBRATION panel.
- Cover the diffuser (incident mode) or the camera lens (reflected mode) with your green or magenta gel.
- Adjust TINT GAIN: reading: aim for 30 M with a minusgreen gel, or 30 G with a plusgreen gel.
- Tap the color temperature and tint numbers at the top right corner of the display again to hide the calibration panel.
- Turn the lamp on and let it warm up for 15–30 minutes.
- Tap and hold the color temperature and tint numbers at the top right corner of the display to show the COLOR CALIBRATION panel.
- Take a reading under the nasty fluorescent light.
- Adjust the TINT GAIN: reading to 30 G.
- Tap the color temperature and tint numbers at the top right corner of the display again to hide the calibration panel.
Here’s a step-by-step picture guide.
If you’re interested, here is a more detailed description:
- Tap and hold the color temperature/tint values
in the upper right corner of the screen to display the color
calibration panel.

Tap and hold the upper right readouts...
...to reveal this panel.
You'll see two sets of settings, each with a slider, -|+ buttons, and a “SET” button. The two rows of controls are completely independent.
You can adjust a setting using any control: the slider or -|+ to change a value, SET to re-apply the current value.
The value above the slider is the target value or gain setting; the value above the -|+ is the current reading.
- CCT: settings set the correlated color temperature calibration: set CCT: to match the color temperature reported by your reference meter, while reading the same light source. Use these controls only when you’re under your calibration light source, or you will reset your color calibration to something very wrong!
- TINT GAIN: settings adjust the sensitivity of Cine Meter II to tint (green/magenta) changes. Set Tint Gain for a change of +/- 30 when you cover the sensor with a minusgreen or plusgreen gel. Tint is always shown as Wratten CC numbers on the calibration panel.You can adjust this setting at any time if you need to increase or decrease its sensitivity without affecting the overall color calibration.
What you need to calibrate the color meter:
- A stable tungsten light source (very important: calibration under older LEDs, fluorescents, HMIs, and plasmas may give you incorrect results, especially for tint),
- A full minusgreen color-correction gel (and/or a full plusgreen, if you like),
- A color meter you trust (No meter? You can make some assumptions; read on...).
For the gels, a swatch book works fine: you only need gels big enough to cover the diffusion over the lens.
If you don't have and can't borrow a color meter, you can use a camera that shows you its white balance values in Kelvins, or lets you assign the white balance in Kelvins. Or, you can assume the temperature and tint values needed, and correct them later based on experience or the sudden availability of a color meter. Assume 2750 K for household incandescents, 2900 K for high-intensity halogen lamps, or 3100 K for tungsten motion picture lamps.
The CCT adjustment sets the current temperature to your selected value, and sets tint to zero. Set CCT under a tungsten light source. Measure this source with a properly calibrated color meter (the meter should be in digital mode, not film mode, if it gives you the choice).
If you don't have access to a color meter or digital camera, assume 2750 K for household incandescents, 2900 K for high-intensity halogen lamps, or 3100 K for tungsten motion picture lamps. Even a rough calibration of this sort is likely to be better than your iDevice's uncalibrated default setting.
Tip: if you use this “guess your best” method, and you find the meter is still reading low (too warm), recalibrate under the same light at a higher target CCT, e.g., 2800 K instead of 2750 K. If your readings are too high (too cool), recalibrate with a lower target value, e.g., 2700 K instead of 2750 K. Repeat as needed until you find the target CCT value that gives you good readings that agree with your reference meter (if you have one) or with practical results.
What the controls do:
Adjusting the CCT: controls causes Cine Meter II to read the current light as your targeted temperature and tint, so make sure you only adjust CCT: controls under your calibration lighting setup!
Tint Gain: adjusts green/magenta sensitivity. Under tungsten incandescents, cover the photosphere with a full minusgreen filter, and adjust Tint Gain for 30 M. With a plusgreen filter, aim for 30 G. (These values assume that tint gain's value starts at 0; if not, aim for a difference of +/- 30 compared to the starting value.) The tint values shown here are always Wratten CC filter values.
If you find that this tint gain calibration causes Cine Meter II to overestimate tint correction under fluorescent or LED lights, you might want to set tint values of 15 to 20 instead of 30, or simply fine-tune the Tint Gain setting as you work.
Tint Gain can be adjusted at any time, under any lighting conditions, without changing the basic temperature/tint calibration of Cine Meter II. All you're doing is adjusting how strongly Cine Meter II reacts to tint differences, so feel free to tweak it whenever you feel like it. Just don't touch the top-row CCT: controls unless you’re under your calibration light source!
Thus, to calibrate the color meter:
- Measure your light: Use your reference color meter to measure color temperature under your calibration source. If you're using a camera with a white-balance setting or readout instead of a color meter, place a color-neutral reflective reference such as a white-balance card or the white/gray side of a DSC Labs OneShot chart under your light source, and adjust your camera to it: press AWB and see what reading the camera gives you, or dial in white balance with the Kelvin control until the image is neither warm nor cool.
- Display Cine Meter II's color calibration panel.
- Place Cine Meter II in exactly the same spot as your reference meter, and adjust CCT controls to match your other meter as closely as possible. Alternatively, set CCT to your target value, put Cine Meter II in the measuring position, and tap the SET button to calibrate to the target values. CCT should match your other meter's reading to the closest 10 K value.
- Using a plusgreen or minusgreen gel and a tungsten source, as described under Tint Gain above, to set tint gain.
- Alternatively, measure a nasty household or industrial fluorescent light, unfiltered, and set tint gain to 30 G.
It’s not as bad as it sounds: here’s a step-by-step picture guide.
You can re-adjust the Tint Gain at any time without affecting the basic color temperature and tint calibrations. You may find that the meter will overestimate the tint corrections needed for fluorescent lights, HMIs, plasma lights, and LEDs; if you prefer, you can adjust tint gain for a reading of -15 to -20 with a full minusgreen gel for more accurate readings under those sorts of lights.
Note: calibration is required for each “sensor position” you enable; the front and back cameras are different, and they give you different results in incident and reflected modes, too. If you use Front Incident Meter, you have to calibrate it separately from Back Incident Meter; if you turn on Show Reflected Color in Settings, you'll need to run calibration for your Front and Back Spotmeters, too, using a color-neutral target illuminated by your calibration light source.
- Measure color
temperature and tint (version 1.6 or newer, iOS 8 or
higher): In incident mode, aim the diffuser at your light source, just
as you would with a color meter.
Read the color temperature and tint, shown in the upper right corner of the screen. Temperature is shown in Kelvins; tint is shown as Wratten CC numbers (you can change tint to display in plusgreen/minusgreen or ∆uv values instead using Settings > Tint Display, and you can change the CCT and Tint display to CIE 1931 x,y coordinates using Settings > Show Chromaticity):
- You can incident metering for the back camera as well as the front camera: Settings > Use Back Incident Meter.
- You can enable color temperature readings in reflected-light mode: Settings > Show Reflected Color. For best results, aim the camera at a color-neutral target like a white-balance card or a DSC Labs OneShot.
- A colored, rounded-corner frame, like the spotmeter frame, appears in the live image to show you the area in which color is measured. It's accurate at 1.0x magnification but only approximate when you zoom in.
- You may see a warning message under the tint readout.
“UNCALIBRATED” means that you haven't calibrated
this sensor position yet. A warning sign followed by a color name
indicates that the light has more of that color than Cine
Meter II can compensate for: results may be less
accurate than normal—in practice, Cine Meter II seems to measure
color fairly well even when the warning is visible.
- Correct color
temperature and tint (version 1.6 or newer, iOS 8 or
higher): Tap the color temperature/tint values onscreen to show the
Color Correction Panel. The panel shows the correction needed to
correct the meter's reading to your target value (target mode,
as when correcting lighting to match your camera's white balance), or
to correct your source value to match the meter's reading (source
mode, as when you need to gel lights to match ambient
lighting). Toggle between these modes with the ⇆ button.

In Target mode, adjust the slider for your production camera’s white balance setting, and the panel will show you suggested gels to match the lighting to the camera.

In Source mode, set your source color temperature using the slider, and the panel will show you the gels you need to use to match your lights to the ambient color temperature.
- Versions 1.6 and 1.7 only show Target mode corrections; update to 1.8 or newer for Source mode.
- Readings are approximate, and should be verified by looking at the corrected light using your production camera.
- CC gel correction values are appropriate for full-spectrum sources. With fluorescents, LEDs, and other “spiky spectrum” sources, you typically need 1/2 to 2/3 the correction shown. If you wish, you can adjust the Tint Gain to show 15 M to 20 M for a minusgreen gel instead of 30 M, and the suggestions are more likely to be correct under the sources where you're more likely to need tint correction in the first place.
- Save and restore calibration:
You can save Cine Meter II's calibration data to a file, so that if
you delete and reinstall the app, or if you mistakenly change its
calibration, you can restore it. A calibration file includes exposure
calibration, color calibration, and brightness correction data.
- To save the calibration, open Help & Settings, scroll down to SETUP and tap Save in Save Calibration. A calibration file is created, and a Share Sheet pops up, allowing you to save the file to iCloud or Notes, or send it to yourself in an email.
- To restore calibration, select a saved calibration file, open its Share Sheet, and choose Cine Meter II. Cine Meter II opens, and reads the calibration file. If the file was created on an iDevice with a different name, you’re warned of that and give the choice to load it or to cancel.
- A calibration file is only correct for the iDevice it was created on: even loading it on another iDevice of the same type does not guarantee that its readings will be correct, as two iDevices of the same type (say, two different iPhone 11s) often require different calibrations.
- Launch Cine Meter II from
another app: to open Cine Meter II from an automation app
like Shortcuts or Launch Center Pro, use the URL scheme
“cinemeterii://”.
- Record brightness and color logs: Cine
Meter II can record a log of brightness and color values over time for
later analysis. Data are stored in a plain-text,
comma-separated-values file you can open in a spreadsheet or text
editor.
Enable logging with the Show LOG Button in Help & Settings, and set the interval between data points with the Log Interval slider.
When Show LOG Button is on, a LOG button will appear on the left side of the picture. Tap the LOG button to start recording; it will change to a red REC button. The log will record the brightness, and color temperature and tint when available, at the specified intervals. Temperature is recorded as Kelvins. Tint is recorded as Wratten CC numbers, positive for green, negative for magenta.
Tap REC to stop logging. A pop-up alert will show you the log name and its size, and let you view the list of recorded logs.
- Logging will also stop if you tap the
or
 buttons, show the iOS
control or notification panels, close the app, or let your iDevice
sleep. The log is still saved in the Logs list in Help & Settings.
buttons, show the iOS
control or notification panels, close the app, or let your iDevice
sleep. The log is still saved in the Logs list in Help & Settings.
- Do not lock the camera’s exposure or white balance while logging,
or you may not get accurate results. If you use
make sure DIFFERENCE MEASUREMENT is turned on so that the camera
remains unlocked.
- When the light changes suddenly it can take the camera a few seconds to adjust its exposure, during which time color values can be wildly inaccurate. This is obvious if you’re watching Cine Meter II when it happens, but it may not be obvious when you're reviewing logged data. If you see extreme swings in color data, especially momentary negative spikes in tint values, at the same time as exposure is changing, that’s likely to be a measurement artifact, not valid data.
- If you let them, logs will record until your iDevice runs out of memory, at which point Cine Meter II will be terminated by iOS (and the offending log will be lost). Consider that a 24-hour log at 1-second intervals would have 86,400 lines and consume about 1.7 Megabytes. The same log at 30-second intervals would have 2,880 entries and fit in 57 kilobytes. If you wish to record logs over a very long period, pick an appropriate sampling interval to avoid data overload. Both your iDevice’s memory and your subsequent data analysis workload will thank you!
Read data remotely: Turn on Cine Meter II’s web server and you can get basic brightness and color readings with an HTTP query.
Turn on remote access using the Enable Web Server switch in Help & Settings. Cine Meter II shows you the addresses you can use: the IP address URL of your iDevice, and its “Bonjour URL” if available (a URL is also shown on the main screen in the third information box between the controls and the toolbar, when the box is not showing other information).
Point your web browser to (or, in software, perform an HTTP GET from) one of those URLs. Cine Meter II returns a plain-text file with brightness and color data, for example:
brightness_SI 127.2 lx
brightness_US 11.82 fc
CCT 5030 K
∆uv .0075
cie1931_x .3456
cie1931_y .3673
- Data will not update or will not be available if you show the iOS control or notification panels, close the app, or let your iDevice sleep.
- Do not lock the camera’s exposure or white balance while reading data remotely, or
you may not get accurate results. If you use ,
make sure DIFFERENCE MEASUREMENT is turned on so that the camera remains
unlocked.
- When the light changes suddenly it can take the camera a few seconds to adjust its exposure, during which time color values can be wildly inaccurate. This is obvious if you’re watching Cine Meter II’s screen when it happens, but it may not be obvious when you're reading data remotely. If you see extreme swings in color data, especially momentary negative spikes in tint values, at the same time as exposure is changing, that’s likely to be a measurement artifact, not valid data.
- Data are always available regardless of Cine Meter II’s display settings. The text file may contain more information than shown here, but it will always include these lines.
Logs are stored until you delete them. Tap Logs in Help & Settings to show the log list. You can tap a log for sharing and viewing options. Swipe left on a log to delete it.
Logs can also be managed using iTunes sharing (macOS 14 or earlier) or Finder file sharing (macOS 15 or later).
Exposure calibration in pictures

You'll need a flat, evenly-lit target, like an 18% neutral gray card.
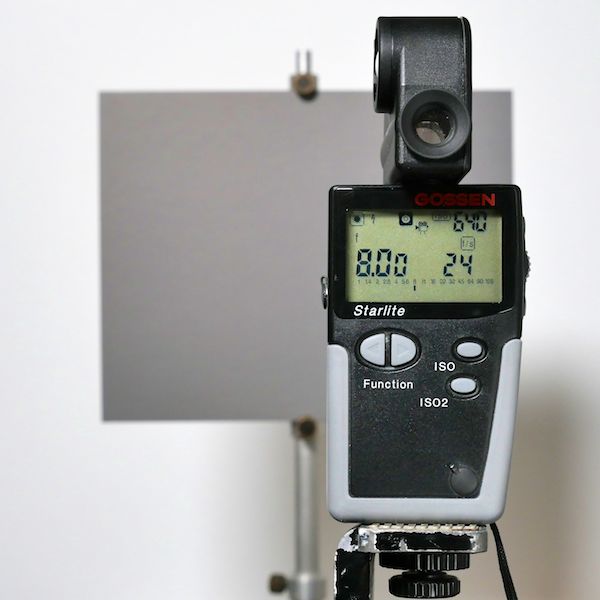
Use your reference meter to take a reading.
If you don't have a reference lightmeter, you can use your camera's meter instead. For the most accurate results, your camera should be in a normal gamma (e.g., STD, Rec.709, etc.), not Log, SLog, LogC, Cine-Like, Cine D, Cine V, V-Log, etc. If you're using a Blackmagic camera, it should be in Video mode, not Film mode.
Cameras may not give exactly the same reading as a stand-alone meter because cameras often “expose to the right” (opening up as much as a stop above what a separate lightmeter measures). If your camera has a histogram, see if you can adjust the camera so that the spike in the histogram is at the 40% - 50% brightness level for the most accurate results.
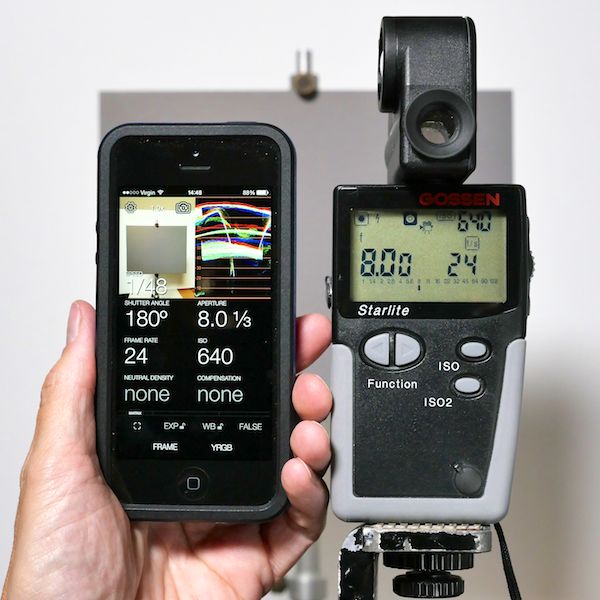


To adjust the reading, tap COMPENSATION.

(If you're using Cine Meter II version 1.5 or newer, the slider also has a Cal... button.)
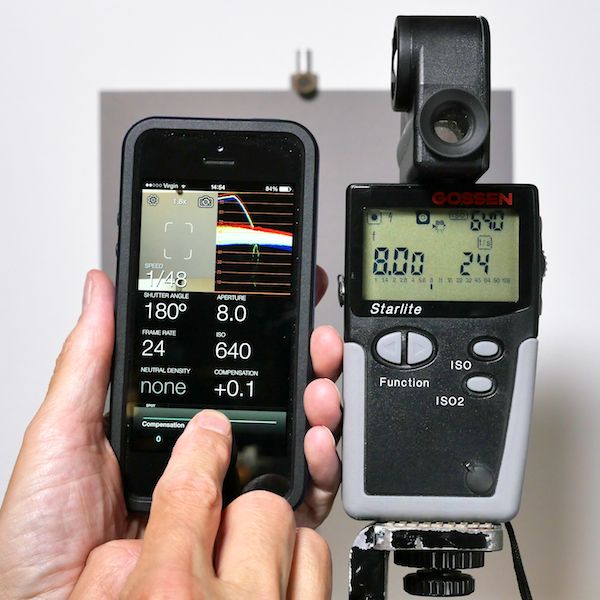
Dragging the slider to +0.1 corrects the reading...
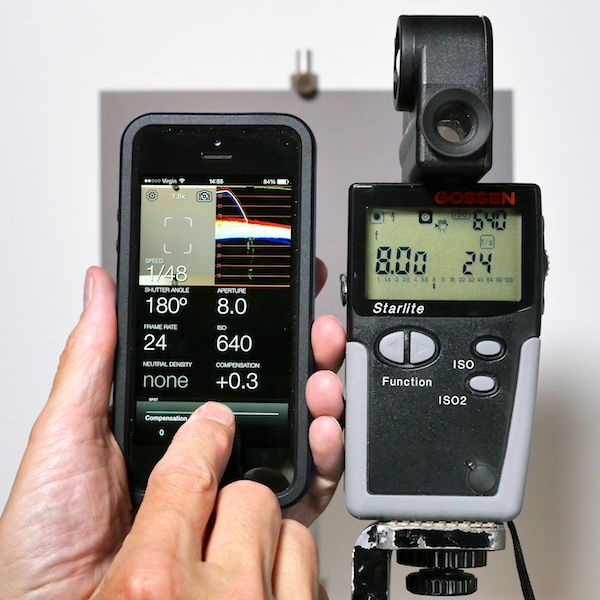
...and +0.2 and +0.3 are also correct...
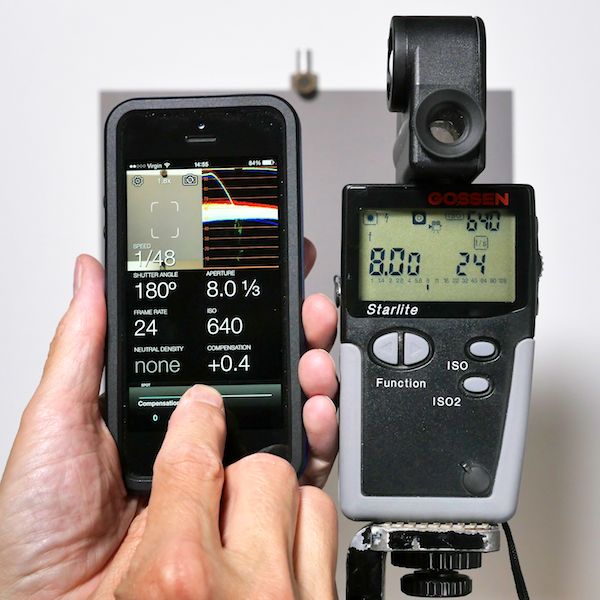
...but at +0.4, the reading is now 1/3 stop too fast.
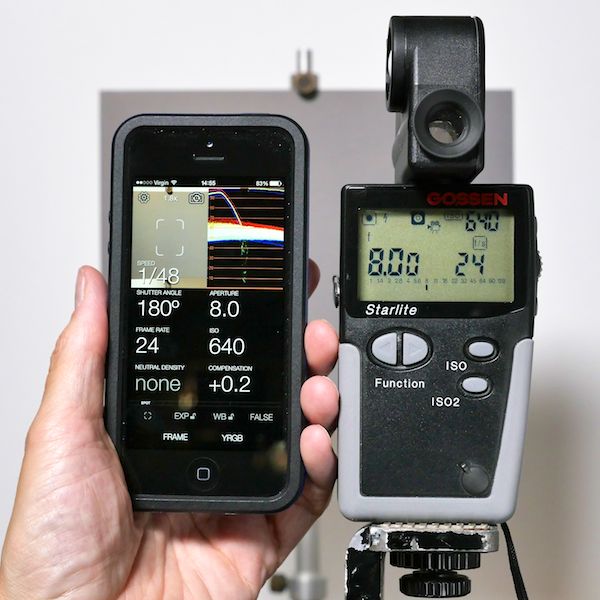
As +0.1, +0.2, and +0.3 all work, I used the middle value of +0.2.
If you're using an older version of Cine Meter II, read on...

Tap the
button to open
Setting and Info, and then tap Meter Calibration.
I've set Back Camera Calibration to 0.2 stop.
(If I already had a Back Camera Calibration value shown, I'd add my new value to it.)

Don't forget to zero out COMPENSATION once you're done!

Now, Cine Meter II's reading matches my reference meter.

Alternatively, you can use a large, evenly-lit wall as your calibration target: sit or stand facing away from the wall, and aim your iDevice's front camera over your shoulder to take a reading.
Incident readings are best calibrated against another incident meter (these pictures show an older version of Cine Meter II where Incident Metering mode was called Luxi mode):
Legacy color calibration in pictures
(These pictures show an older version of Cine Meter II where Incident Metering mode was called Luxi mode.)

You'll need a tungsten (incandescent) light of some sort. You don't need a "movie light"; here I'm using a 120W reflector flood installed in a ceiling can in the hallway.

Set up the calibration location. I've set up a folding table beneath the hallway light, and I've marked the precise spot I'll be taking readings at. This is important; the measured color temperature can vary depending on where in the "beam" of light you take the reading. In this case, I saw a 20 K variation in temperature from one side of the table to the other. I have my reference meter (Minolta Color Meter II) and an iPod touch running Cine Meter II with a Luxi on the front camera as its diffusion. (Don't have a reference meter? Read on anyway!)
(If you're calibrating incident metering on the back camera instead of the front camera, it's best to stand in one spot. Look towards the light as you would when using incident metering on the back camera, and take your reference meter reading with the color meter held in the same position you'll hold your iDevice in.)

Take your reference reading at the designated spot. Take several readings to ensure that you've got a good, average value; color temperature readings can be highly variable, so never trust just one.
If you don't have a reference meter, calibrate to 2750 K under standard household tungsten lamps (60W or higher); 2900 K with a high-intensity halogen lamp; or 3100 K under a “3200 K” motion-picture tungsten light. This assumed-value calibration won’t be perfect, but it’s likely to be more accurate than the uncalibrated reading. If you use this “guess your best” method, and you find the meter is still reading low (too warm), recalibrate under the same light at a higher CCT, e.g., 2800 K instead of 2750 K under household tungsten. If your readings are too high (too cool), recalibrate with a lower value, e.g., 2700 K instead of 2750 K. Repeat as needed until you find the target CCT value that gives you a good calibration.

Next, put Cine Meter II with the diffusion on the same spot. Make sure you're in incident metering mode, with “Incident Metering” shown (in this older version, the Luxi logo is shown instead).

Tap and hold on the color readout to display the COLOR CALIBRATION panel at the bottom of the screen.
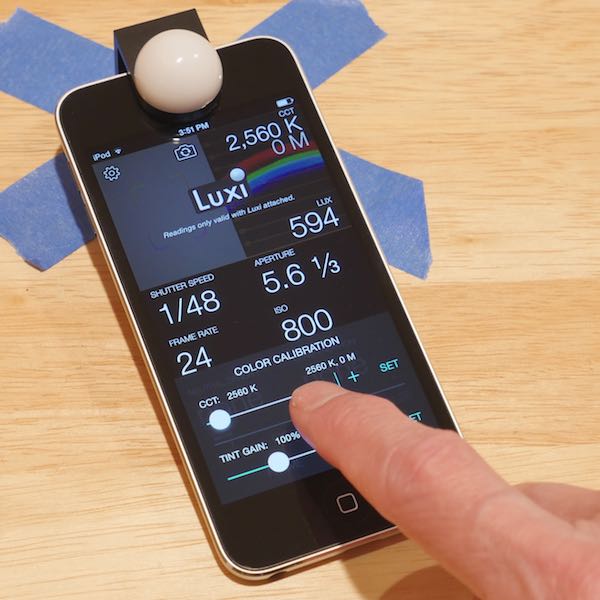
Calibrate CCT: Using the CCT slider, +|- buttons, and/or the SET button as needed, set the CCT to the same value you got with your reference meter.
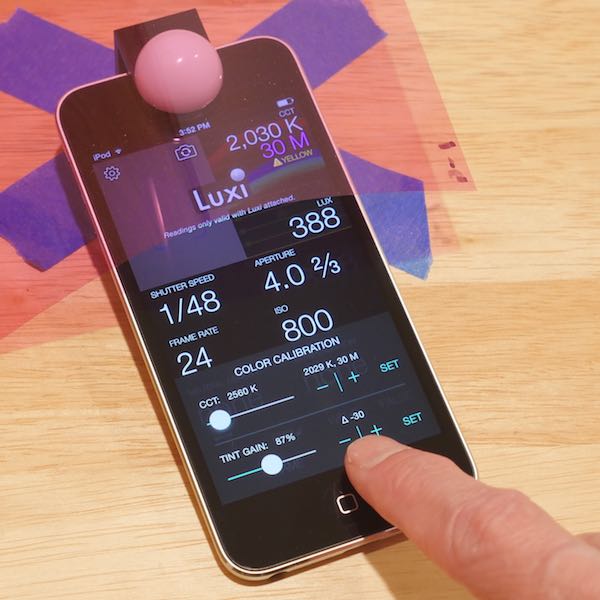
Calibrate tint: cover the diffusion with a full minusgreen gel, and use the TINT GAIN slider, +|- buttons, and/or SET button as needed to get a reading of 30 M (shown as ∆ -30 on this older version of the app). Tint is always shown as a Wratten CC number on the calibration panel.
If you only have a half minusgreen gel, aim for 15 M instead.
If you use a full plusgreen gel, 30 G is your target.
If you have both minusgreen and plusgreen gels, don't be surprised if the gels give different numerical values. You can choose to split the difference (e.g., 25 M for the minusgreen and 35 G for the plusgreen), or just use the minusgreen gel for calibration.
If you don't have any color correction gels, take Cine Meter II to someplace with standard household / office fluorescent lights, and adjust TINT GAIN for a value of 20 G to 30 G (do not touch any of the CCT calibration controls when you do this; only use them under your CCT calibration light). Fluorescents vary in their green content, but 20 to 30 is a good starting point if you don't have any gels.

If you turn on Show Reflected Color, calibrate it by focusing on a gray card or white-balance card placed at your target spot. Use Cine Meter II's zoom function to focus in closely on it. For tint calibration, hold your gel in front of the camera's lens.
When you're done, just tap the color temperature/tint readout again, and the calibration panel will slide out of the way.
© 2014–2023 Adam J. Wilt. Last updated 2024-03-19