| HP Displays for 1080i Monitoring | Hewlett-Packard computer displays with analog component inputs |
| Dell 2405FPW | Dell's 24 inch computer display with analog component inputs |
| Tweaking HP Display Geometry | Older displays need persuasion to show 16x9 properly |
| Tricking HP Scanning | Show pixel-for-pixel video unscaled |
| Connecting HDV via DVI | Adapters for HP, Sony, Apple, Dell, and other 1920x1200 LCDs |
| Attenuating HP Input Gain | Keep the highlights from blowing out on older
displays |
If you're shooting 720p HDV, there are a lot of inexpensive LCD TVs
that display 720p material natively, but as of summer 2005 there still
aren't many affordably-priced monitors that show 1920x1080 material in
its native, full-resolution form. Many folks use a combination of
adapters to convert the analog component HDTV from 1080i HDV cameras to
DVI-D for display on 1920x1200 computer displays (see below),
but
that gets expensive and cumbersome.
Hewlett-Packard to the Rescue
 Fortunately,
HP has two secret weapons, the L2335 and f2304
23-inch computer displays with analog component inputs. These are
1920x1200 LCDs; the L2335 is oriented towards office workers and has a
flexible tilt/swivel/pivot stand, while the f2304 is aimed at home
computing / home theater with under-monitor controls, side-mounted
speakers, and slicker styling. Both offer DVI-D, DVI-A, analog HD15
(VGA), analog component, S-Video, and composite video inputs.
Fortunately,
HP has two secret weapons, the L2335 and f2304
23-inch computer displays with analog component inputs. These are
1920x1200 LCDs; the L2335 is oriented towards office workers and has a
flexible tilt/swivel/pivot stand, while the f2304 is aimed at home
computing / home theater with under-monitor controls, side-mounted
speakers, and slicker styling. Both offer DVI-D, DVI-A, analog HD15
(VGA), analog component, S-Video, and composite video inputs.
August 2005 prices (US$):
- f2304: $1600 list; $1300 direct
from HP after rebate, $1000 refurbished, also direct from HP.
- L2335: discontinued? Still, it's $1200 new from B&H
The good news: When properly set up, these displays accept the analog component signal from an HDV camcorder or deck and display it with the same clarity and sharpness obtained on a good HD CRT with the aperture correction turned up to boost high frequencies. They show enough detail to allow critical decisions about focus, detail, and artifacting. They're the cheapest ways available to monitor 1080i HDV with real-time performance and pixel-for-pixel sharpness.
The bad news: The HP displays crop the image slightly (like overscan),
showing only 94% of the image both horizontally and vertically, so they
won't help you see the edges of your frame. Colorimetry is uncertain
(but somewhat tweakable). Older HP displays need input
attenuation to show the full tonal scale of the image. And older
displays need to be tricked into
showing 16x9 as 16x9; by default, they show it as 16x10 (filling the
16x10 screen).
Overall, the images are bright and contrasty. Black levels are very
good for an LCD. Motion rendering is slightly blurry (as you'd expect
from a continuously-illuminated device like an LCD) but pixel latency is
minimal. Any smearing with motion is consistent in color and tone and
does not impair viewability.
Input Cropping
The HP displays work like consumer TVs: they don't show the whole raster. Specifically, they show 1804x1015 pixels out of the 1920x1080 pixel source material, a loss of about 6% in both the horizontal and vertical directions. Similarly, standard-definition (480-line) analog component is shown as 676x451, while composite and S-video inputs are listed as 676x230 (!) although they still appear to have both fields of information (the 230 number implies that only a single field is being shown).
I haven't found a way to make the display show the full raster except through the addition of external DVI converters (details below):
 |
 |
| Via
analog inputs in pixel-for-pixel mode, you can see the slight cropping applied to the edges of the image. |
Via
DVI through AJA converters, the full raster is shown in pixel-for-pixel mode. Note also the different colorimetry. |
Furthermore, the cropping is somewhat uneven; out of the 65 scanlines
cropped, about 25 are taken off the top and 40 off the bottom (or vice
versa; it's been a while since I measured this). I haven't measured the
horizontal position in great detail. In any event, the cropping is
comparable to that in the Sony HDR-FX1's LCD and viewfinder; both the
Sony and the HP follow the sad tradition, carried over from SDTV, of
masking the edges of the frame.
There's more on setting up the HPs below.
Dell 2405FPW
Dell also offers a 24-inch 1920x1200 display with component inputs, the 2405FPW, which retails for only US$1200, often less depending on what promotions Dell is running. The USA website for it is here. It offers DVI-D, VGA, component, composite, and Y/C inputs; it has PiP (picture-in-picture) and PbP (picture-beside-picture: two images side-by-side) modes, and it has built in speakers, USB ports, and memory card readers for most flavors of memory card. The monitor offers "normal" and "video" modes; the latter appears to pull down the midtones much as Cinegamma does on a camera. The Dell frame-syncs with the AJA HDP, just like the Sony and Apple displays.I don't yet know how well it handles 50i material.
We (Omneon) recently bought a 2405FPW for evaluation as an HD tradeshow monitor. The Dell makes a big, bright picture with excellent contrast, evenness of illumination, and good colorimetry. It also appears to show the full raster when fed analog HD (even if not the full raster, it's certainly more of the image than my FX1 camcorder's LCD shows; I didn't have any test clips with edge markers to verify the full-rasterness of the display). On well-shot, mostly stable film imagery, the pictures are very nice.
However, fast cross-frame motion (more commonly found in 60i video origination) reveals an odd artifact: highlights smear across multiple frames (almost like phosphor lag in a CRT), and fast-moving contrasty edges can show a strange contouring, almost like an edge-detection or sharpening artifact from previous frame superimposed on the current one. This latter artifact reminds me of some of the contouring defects on early DLP displays; I've never seen anything like it before on an LCD, and I'm at a loss to explain it. Similarly, there's a lag artifact in the shadows; a passing bright object leaves a one-frame trail of brown or purple (depending on viewing angle) smear, almost as if the pixels in the smeared area are still in the process of changing state.
As a result, the images from the Dell can be distracting on shots of fast motion with high contrast. The edging and contouring artifacts are quite noticeable. If you shoot mostly film-style, the Dell may be perfectly suitable: we played the 1080p trailer for The Brothers Grimm, and it looked very good indeed. If instead you have fast-moving 50i or 60i video clips, the artifacting may be an issue: shots of pigeons walking in front of a bright background on my test tape showed obvious contouring on the pigeons' dark bodies, while the same clips single-framed looked fine. I shot about 20 minutes of "beauty shots" around Amsterdam in 50i HDV for IBC 2005 (traffic, coots on the water, bicyclists in Beatrixpark, etc.), and the contouring was visible perhaps 20% of the time, and distracting on a small number of the shots.
Overall, although the Dell seems slightly less "smeary" (the numbers bear this out: 12ms response time compared to 16ms on the HPs) and it shows the whole raster without obvious cropping, the HPs render motion more cleanly.
HP Setup, step-by-step
Tweaking the Geometry
There are at least two versions of HP display firmware floating around, and they differ in how they deal with analog component signals. There's no way I know of to display the firmware version; you can only observe the behavior of the display and infer it (I know there are at least two firmware versions available following correspondence with HP; there may be more).
The older version of the display shows 1080i 16x9 inputs vertically stretched to fit the 16x10 screen, and you are not given any options over image sizing for analog component inputs. You can however override the default setting with a bit of trickery and show 16x9 as 16x9, either filling the screen width with a letterboxed image or showing it in a pixel-for-pixel mode. I saw this firmware in a display manufactured in February 2004.
The newer version of the display shows 1080i inputs as 16x9. By default, it fills the width of the 16x10 screen with the letterboxed image, but you can also zoom to fill the height of the screen with picture, in which case the sides of your picture will be cropped to fit while maintaining a proper pixel aspect ratio. You can also trick the display into showing you a pixel-for-pixel representation of the image with a bit of work. This firmware is installed in displays manufactured at least as early as September 2004.
Telling the Firmware Versions Apart
The key point in telling which version of firmware you have is seeing if you have control over the image in analog component mode.

|
Feed the monitor an analog component signal. Press the menu button to display the main menu. Scroll down to Image Control and press the menu button again. |

|
The old firmware's Image Control menu shows a Custom Scaling option, but it's not selectable when the input is set to analog component. |

|
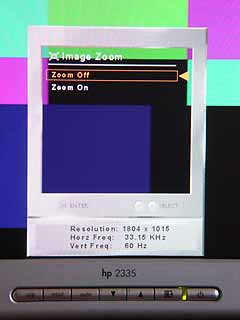
The new firmware's Image Control menu shows an Image Zoom option which you can select. |
|
Image Zoom: Zoom Off shows the image filling the width of the screen with black letterboxing top and bottom. Zoom On zooms the image to fill the screen vertically; the edges are cropped as a result, but the pixel aspect ratio stays the same and circles still show up as circles. |
Tricking the Monitor
To get either HP monitor to show the image in pixel-for-pixel mode, and
to get the older monitors to stop showing the image as 16x10,
you have to trick the monitor. These displays give you more control over
the VGA input than over the video inputs, and changes you make in VGA
mode carry over into video input modes as long as the scan rates are the
same for both inputs. (This VGA trick won't work in 50i, but if you're
using a Z1, set it to 60i, and the changes persist at the slower frame
rate. If all you have is the 50i FX1E, borrow a Z1 to set up the
monitor!)
 You can
connect an HDV source to the VGA input using any commonly available
HD15-to-component adapter cable. These cables have a VGA connector
(a.k.a. D-SUB HD15) on one end, and three or five BNC or RCA connectors
on the other. Such cables are commonly used to connect separate RGB or
Y/Pr/Pb signals to a VGA connector for computer monitor interfacing, and
nowadays are also used to connect component video into many popular
projectors. You can get the posh home-theater version from Monster Cable
for about $200, or do like I did: go to a supplier like Action Computer
& Surplus in Sunnyvale and buy a slightly less elegant one for $14.
Both work equally well.
You can
connect an HDV source to the VGA input using any commonly available
HD15-to-component adapter cable. These cables have a VGA connector
(a.k.a. D-SUB HD15) on one end, and three or five BNC or RCA connectors
on the other. Such cables are commonly used to connect separate RGB or
Y/Pr/Pb signals to a VGA connector for computer monitor interfacing, and
nowadays are also used to connect component video into many popular
projectors. You can get the posh home-theater version from Monster Cable
for about $200, or do like I did: go to a supplier like Action Computer
& Surplus in Sunnyvale and buy a slightly less elegant one for $14.
Both work equally well.
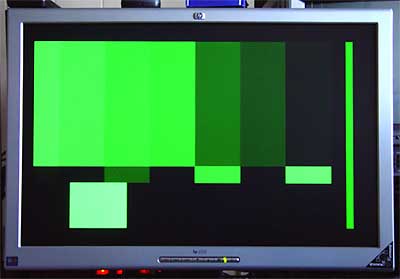
Connect up the green connector (Y or Luma channel) from the camera or deck to the green connector on the adapter cable and connect the adapter to the HP display. Don't worry about the red or blue connectors, or, on some adapters, the black and white connectors (H and V sync for RGB signals). The HP isn't expecting a Y/Pr/Pb signal on the VGA connector--it expects RGB--but it will detect and lock up to a luma signal, especially something with a clean, strong pattern like color bars. The image will be appear green, and will be offset horizontally as shown; don't worry about it (the bright green bar at the right side of the picture is the positive-going pulse of HD's tri-level sync signal). The important thing is that the monitor detects the frequency and scanning format of the input and lets you manipulate the display using the Custom Scaling option in the Image Control menu. Any settings you make here will carry over when you reconnect the HDV source to the analog component inputs.

|
Bring up the Main Menu and select Image Control. With either version of firmware, the Custom Scaling option is available. |

|
Custom Scaling gives you three options: Fill To Screen- Blows the image up to fill the 16x10 screen. Circles will be shown as thinned ovals. This is the default video display mode on the older displays. Fill to Aspect Ratio - Blows the image up to fill the width (16x9 HD signals) or height (4x3 SD signals) of the screen, showing letterboxing or pillarboxing as needed to preserve the picture's proper aspect ratio. This is the default video display mode on the newer displays. One to One - The image will be displayed without any scaling in pixel-for-pixel mapping: one scanline per row of pixels. A black border will surround the picture as needed. SDTV pictures will display as small centered images in a vast expanse of black--a nice demo of the difference between SD and HD! |
You can now reconnect your HD source to the analog component inputs. The changes you made in VGA mode will persist. However, if you change things in component mode, you'll have to reconnect to the VGA input to re-establish the settings there.
In One to One or pixel-for-pixel mode, the internal scaler is disabled, and theoretically at least you'll see the truest possible image. In this mode, interlacing artifacts show up when there's motion in the image, which can be a little distracting.
In Fill to Aspect Ratio mode (the default video display on the newer monitors as long as Zoom is set to Off), the internal scaler blows the image up slightly, and provides field-to-frame interpolation as far as I can tell: moving images don't show distracting interlacing artifacts. In theory, the image should be softened a bit in this mode due to the action of the scaler's interpolations, but in practice it appears to be as critically sharp as in pixel-for-pixel mode: I don't see any noticeable degradation or softening of important detail, even on resolution test charts.
Connecting HDV via DVI
I also tried connecting HDV via DVI, using two adapters from AJA.
The HD10A, US$1500, converts HD analog component into HD-SDI (serial digital), the lingua franca of professional HD equipment.The HDP, US$790, accepts HD-SDI and outputs 1920x1200 DVI to any of a range of 23" and 24" LCD monitors: The HP L2335 and f2304, Dell 2405FPW, Sony SDM-P234, Apple 23" Cinema Display, and a variety of Samsungs among them. With the Apple, Dell, and Sony, it locks the display to the 60i video frame rate; with the others, it runs at normal VESA rates, so there may be the occasional skipped or repeated frame. With the HP L2335, I found it repeated a frame every few seconds to maintain sync; this was only noticeable on scenes with steady motion, like slow zooms, pans, or text crawls.
In 50i, only the Sony display remains frame-locked; all the others will show rate-conversion artifacts according to AJA. With the Dell 2405, for example, 50i footage stutters repeatedly; smooth motion shows evidence of repeated frames several times a second, although the jitter is not so annoying as to render the display unusable.
With the HDP, the HP L2335 displays the full 1920x1080 pixels of the HD source, so that the monitor can see the entire image, not just the action-safe area. I also observed (as shown in the images above) that the colorimetry was rather different; the DVI connection showed red tones more like those seen on the Sony camera's LCD and on an analog HD CRT.
In place of the HDP, one might use the Blackmagic Design HDLink, US$695. I haven't tested one, so I can't compare it to the HDP in terms of picture quality or functionality. The HDP seems to have the upper hand in terms of signal scaling flexibility, while the HDLink wins on LUT (color look-up table) tweakability, but heck--anyone can read the specs from the websites!
Attenuating the Input Gain (older HP displays)
On the older HP display, I found that tonal values in excess of about 80% exceeded the maximum brightness of the analog inputs and blew out nastily. For testing purposes, I attenuated the Y signal by connecting a 75 ohm terminator in parallel with the input: I ran the Y signal through a BNC tee connector, and put the terminator on the base of the tee (there were various RCA-to-BNC adapters in use, too). That brought the brightness gain into the range where I could properly adjust it with the brightness and contrast controls on the display, but of course it overterminated the feed from the camera.
For long-term use, I'd recommend a passive divider network: I'd put a 75 ohm resistor in series with the Y signal, and a 150 ohm parallel bypass to ground. This combo, in combination with the 75 ohm impedance of the input, preserves the overall input impedance of 75 ohms while cutting the gain at the input by 50%. Other values are possible for other gain reductions, based on the following formulas, where gain ranges from 0.0 to 1.0:
- Series Resistor Rs = (75 / gain) - 75, ohms.
- Parallel Resistor Rp = ((75 * Rs) + (75 * 75)) / Rs, ohms
Plug 'em into your favorite spreadsheet and go to town... of course, some combinations of resistors are easier to find than others. Construction of the resistor network suitable for your display, as well as the soldering up of the actual hardware, is left as an exercise for the reader.
The newer display's input range appears to encompass 0%-100% without problems; values over 100% clip. If I get ambitious, I might try cutting the input gain to 0.9 so that I can monitor superwhites, but for now I have more pressing tasks, so I'll live with the display as-is.